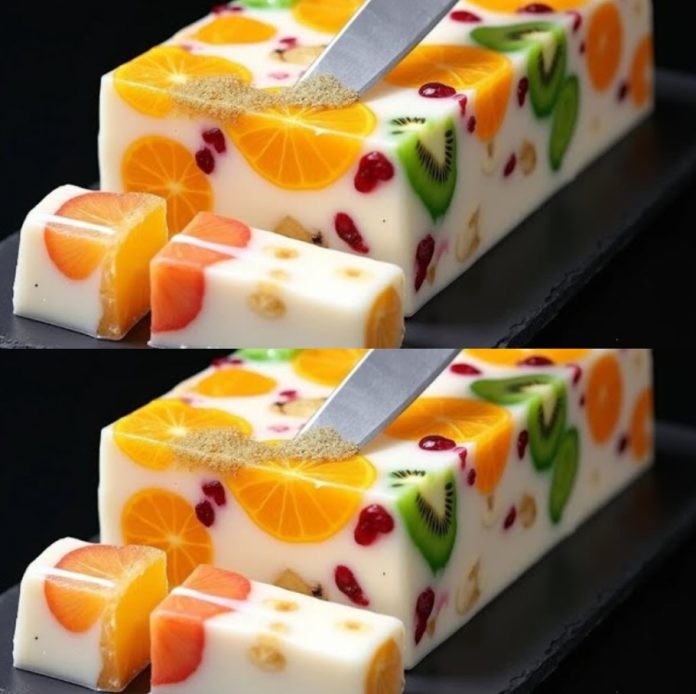
When it comes to quick, healthy, and delicious desserts, it’s hard to beat the simplicity of this Milk and Fruit Dessert. This no-bake, gelatin-free treat is not only a visual delight but also a nourishing indulgence. Made with creamy milk, thickened naturally with cornstarch, and enhanced by the vibrant sweetness of fresh fruits, this dessert is perfect for anyone seeking a wholesome, guilt-free treat.
Whether you’re preparing a dessert for a family gathering, a quick snack for the kids, or a light finish to a meal, this recipe delivers all the satisfaction with minimal effort. Let’s dive into the details!
Ingredients:
- 2 cups milk (choose from cow’s milk, almond milk, or coconut milk for added flavor)
- 2 tablespoons cornstarch (acts as a natural thickening agent)
- 1 tablespoon honey or maple syrup (optional, for a touch of sweetness)
- A variety of fresh fruits, sliced (such as oranges, kiwi, strawberries, blueberries, or mango)
Instructions:
1. Prepare the Milk Mixture:
Start by pouring 2 cups of your preferred milk into a medium saucepan. If you’re seeking a tropical twist, coconut milk can add a luscious, creamy texture. Add 2 tablespoons of cornstarch and whisk thoroughly until the mixture is smooth and lump-free.
Place the saucepan over medium heat, stirring constantly. The goal here is to achieve a pudding-like consistency, so don’t rush the process. Stirring is crucial to prevent the mixture from sticking to the bottom of the pan or forming clumps. Once the mixture begins to thicken, taste it and decide if you’d like to add a natural sweetener like honey or maple syrup. This step is entirely optional, as the fruits will provide plenty of natural sweetness.
2. Arrange the Fruits:
While the milk mixture cools slightly, prepare your mold or serving dishes. A rectangular or square mold works beautifully for a layered effect, but individual cups or bowls can make for elegant single servings.
Slice a variety of fresh fruits, ensuring a mix of colors and flavors. Layer the fruits in the mold, arranging them in an eye-catching pattern. For example, alternate slices of kiwi and strawberries for a vibrant green-and-red combination, or mix mango cubes with blueberries for a tropical burst. Ensure the fruits are evenly distributed so that every slice or portion has a beautiful mix of flavors and textures.
3. Pour the Milk Mixture:
Once the milk mixture has reached a slightly cooled but pourable consistency, carefully pour it over the arranged fruits. Take your time to ensure that the liquid fills all gaps and thoroughly covers the fruit. Gently tap the mold on the counter to eliminate air bubbles and ensure an even distribution of the milk mixture.
4. Chill and Set:
Cover the mold with plastic wrap or a lid to prevent any odors from the fridge affecting your dessert. Place the mold in the refrigerator and allow it to chill for at least 1–2 hours. The chilling process not only sets the dessert but also allows the flavors of the milk and fruits to meld beautifully.
5. Serve:
Once the dessert is fully set, it’s time to unveil your creation! Carefully remove it from the mold by loosening the edges with a knife or silicone spatula. If you’ve used individual cups, they’re ready to serve as is. Slice the dessert into portions and transfer to serving plates. The vibrant layers of fruit against the creamy milk base make for a stunning presentation that’s sure to impress.
Why You’ll Fall in Love with This Dessert:
1. Naturally Sweetened:
There’s no need for refined sugar here. The natural sweetness of the fruits shines through, making this dessert light, refreshing, and guilt-free.
2. Quick and Effortless:
In just 5 minutes of active preparation, you can create a dessert that looks like it took hours to make. With no baking or gelatin required, it’s perfect for busy days.
3. Versatile and Customizable:
This recipe is endlessly adaptable. You can switch up the fruits based on what’s in season or your personal preferences. Add a hint of cinnamon to the milk mixture for warmth or a splash of vanilla extract for an extra layer of flavor.
4. Healthy and Nutritious:
Packed with calcium from milk and vitamins from fresh fruits, this dessert isn’t just delicious—it’s a wholesome treat that you can feel good about serving to your family.
Tips for Success:
- Choose Ripe Fruits: Ripe fruits are naturally sweeter and more flavorful, enhancing the overall taste of the dessert.
- Experiment with Layers: For added elegance, create multiple layers of fruit and milk mixture. Chill between layers to maintain distinct lines.
- Use Clear Molds or Glass Cups: Show off the colorful layers for a dessert that’s as appealing to the eyes as it is to the taste buds.
- Make Ahead: This dessert can be prepared a day in advance, making it an excellent choice for gatherings and potlucks.
Conclusion:
This Milk and Fruit Dessert is a testament to the beauty of simplicity. In just a few steps, you can create a visually stunning and deliciously creamy treat that satisfies both the sweet tooth and the health-conscious eater. Whether you’re serving it at a dinner party or enjoying it as an everyday indulgence, this recipe is sure to become a favorite in your dessert repertoire. With its vibrant colors, creamy texture, and natural sweetness, this dish is a celebration of the wholesome goodness of milk and fruit. So, grab your ingredients and treat yourself to this easy and delightful dessert today!


