
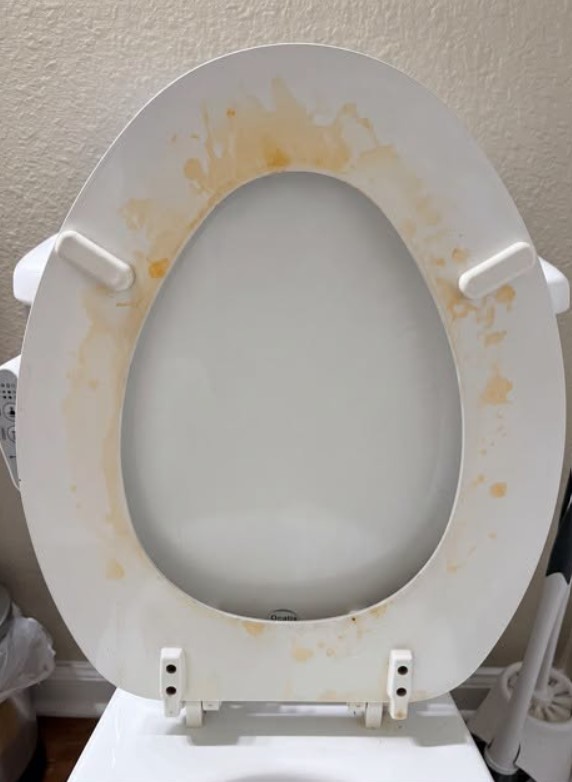
There are some household cleaning problems that are surprisingly difficult to ignore. You can have a bathroom that is otherwise spotless, with a clean sink, freshly washed floor, and neatly folded towels, but one stubborn stain in the toilet bowl can make the entire room look dirty.
For me, one of the most frustrating problems was that ugly yellow ring that appeared around the inside of the toilet bowl, right around the waterline.
I cleaned the toilet regularly. I used toilet cleaner. I scrubbed the bowl with a brush and assumed that eventually the discoloration would disappear.
It didn’t.
The more I looked at it, the more permanent it seemed. It wasn’t simply a little bit of dirt that could be wiped away. It looked like the stain had somehow become part of the porcelain itself.
If you’ve ever dealt with the same thing, you probably know exactly what I mean.
The good news is that a stubborn yellow or brown toilet ring does not necessarily mean your toilet is permanently stained. In many cases, the discoloration is caused by mineral deposits, hard-water buildup, rust, or residue that has accumulated over time.
Once you understand what you’re actually trying to remove, the cleaning process becomes much easier.
Here’s what causes that stubborn ring, why ordinary toilet cleaner sometimes isn’t enough, and how I finally tackled the buildup without spending hours scrubbing.
What Causes That Yellow Ring in the Toilet?
Before trying another cleaning product, it’s worth figuring out what is actually responsible for the discoloration.
A yellow, orange, or brown ring around the toilet bowl is often associated with mineral deposits from hard water. Water can contain minerals such as calcium and magnesium, and when those minerals repeatedly come into contact with the porcelain, they can gradually leave behind a noticeable layer of buildup.
Over time, that buildup becomes harder and more difficult to remove.
Urine residue can also contribute to discoloration, especially when residue is allowed to remain on the surface and dry. In bathrooms where the toilet isn’t cleaned regularly, several types of residue can accumulate together, making the stain even more stubborn.
There is another possibility as well.
If your home’s water contains iron or other minerals, you may notice orange, reddish, yellow, or brown marks around the bowl. These stains can look particularly dramatic on white porcelain because the contrast makes every bit of discoloration stand out.
In other words, what looks like one simple yellow stain may actually be a combination of different deposits.
That’s why repeatedly using a standard toilet cleaner doesn’t always solve the problem.
Why Regular Toilet Cleaner Sometimes Doesn’t Work
Toilet bowl cleaners are useful for everyday bathroom maintenance. Depending on the product, they can help remove ordinary grime, fresh residue, odors, and other surface dirt.
But a thick mineral ring is a different type of problem.
Imagine a thin layer of hard deposits gradually attaching itself to the porcelain. Adding more ordinary cleaner doesn’t necessarily make that hardened layer disappear.
That’s why you can scrub the same area again and again and still see the ring afterward.
You may even reach the point where you’re wondering whether the toilet itself is permanently damaged.
In many cases, the problem isn’t that you haven’t cleaned enough. The problem is that you’re using a method designed for ordinary dirt against a deposit that has become physically attached to the surface.
Instead of simply cleaning over the stain, you need to carefully loosen and remove the buildup.
That’s where a toilet-cleaning pumice stone can be useful.
The Method That Finally Worked for Me
I’ll admit that the first time I heard about using a pumice stone on a toilet, I was skeptical.
Pumice is abrasive, so the idea of rubbing a stone against porcelain doesn’t immediately sound like the safest cleaning trick.
But there is an important distinction: you need a pumice stone specifically intended for cleaning toilets, and you need to use it correctly.
A wet toilet-cleaning pumice stone can help remove stubborn mineral deposits from suitable glazed porcelain surfaces. The goal isn’t to aggressively scrape the toilet.
It’s to gently work against the hardened deposit until it begins to loosen.
The word gently is extremely important here.
You shouldn’t treat the toilet bowl as though you’re sanding a piece of wood. Excessive pressure or using the wrong abrasive material can damage a surface.
If you’re unsure what your toilet is made from or whether it is suitable for this method, check the manufacturer’s cleaning instructions first.
What You’ll Need
You don’t need a huge collection of expensive cleaning products.
For this method, gather:
- A pumice stone specifically made for toilet cleaning
- Toilet bowl cleaner
- Rubber cleaning gloves
- A toilet brush
- Clean water
- Paper towels or a cleaning cloth
- A small bucket, if you need additional water
The most important item is the pumice stone.
Don’t simply grab any pumice stone intended for personal care. Use one that is specifically designed and labeled for cleaning toilets.
You’ll also want plenty of water available because keeping the stone and the porcelain wet is an important part of using this method safely.
Before You Start, Check the Toilet Surface
This is a step that’s easy to overlook, but it matters.
Pumice is abrasive. Even though a toilet-cleaning pumice stone can be appropriate for stubborn buildup on standard glazed porcelain, not every bathroom surface should be treated the same way.
Before you begin, check the manufacturer’s instructions for your toilet.
If the surface is plastic, acrylic, specially coated, delicate, or otherwise not intended for abrasive cleaning, don’t assume that a pumice stone is safe.
When you’re uncertain, it’s better to use a less abrasive cleaning method or follow the manufacturer’s recommended procedure.
For a standard glazed porcelain toilet that is compatible with this type of cleaning, a toilet-specific pumice stone can be helpful for stubborn mineral deposits.
Step 1: Lower the Water Level
Start by flushing the toilet.
The idea is to lower the water level enough that you can clearly reach the stained area.
You don’t necessarily need to empty the entire bowl. You simply want to expose enough of the yellow or brown ring so that you can work directly on it.
If necessary, you can remove some of the water manually using a disposable cup or another appropriate method.
The more accessible the stain is, the easier it will be to work on it carefully.
Step 2: Wet the Pumice Stone
This is one of the most important parts of the process.
Before touching the stain, thoroughly wet the pumice stone.
The porcelain should also remain wet while you’re working.
Never use the pumice stone dry.
A dry abrasive stone can increase the chance of scratching or damaging the surface. Keeping both the stone and the porcelain wet helps the stone glide across the surface while you work on the mineral buildup.
If the stone begins drying out during cleaning, stop and add more water.
There’s no need to rush this process.
Step 3: Work Gently on the Stained Area
Once the stone and toilet surface are wet, place the pumice stone against the mineral buildup.
Use light pressure and small, controlled movements.
Don’t attack the entire bowl at once.
Instead, concentrate on a small section of the ring and gradually work your way around it.
You may notice that the surface begins to feel different as the buildup loosens. That’s a good indication that you’re working on the deposit rather than simply scrubbing the surrounding porcelain.
Keep the area wet as you work.
If you encounter resistance, don’t automatically push harder. Add more water and continue gently.
Patience is much better than excessive pressure.
Step 4: Rinse and Check Your Progress
After working on one section, rinse the area and take a look.
You may be surprised by how much cleaner the porcelain looks once the mineral buildup has been removed.
If some of the ring remains, repeat the process carefully.
There’s no need to try to remove everything in one aggressive session.
Work gradually until the buildup has been reduced.
Remember that the goal is to remove the deposit while protecting the underlying surface.
Step 5: Finish With Your Normal Toilet Cleaning Routine
Once the stubborn buildup has been addressed, clean the rest of the toilet normally.
Apply your preferred toilet bowl cleaner according to its label directions, use your toilet brush to clean the bowl, and flush thoroughly.
Don’t forget the areas that are easy to overlook.
Clean around the rim, beneath the rim where accessible, the seat, hinges, flush handle, exterior of the bowl, and the base.
A toilet can look dramatically cleaner when these smaller areas are given attention too.
What About Vinegar and Baking Soda?
Another popular approach for toilet stains involves white vinegar and baking soda.
These household ingredients can be useful for certain types of cleaning and may help loosen lighter buildup and surface grime. However, they aren’t a magic solution for every stubborn mineral deposit.
The important thing is to understand what you’re trying to remove.
If the problem is a thick, hardened mineral layer, gentle mechanical removal with a toilet-appropriate pumice stone may be more effective than repeatedly applying a mild household mixture.
If you choose to use vinegar or another cleaner, always follow the product instructions and avoid mixing cleaning chemicals together.
Why You Shouldn’t Just Scrub Harder
This was probably the biggest lesson for me.
When something looks dirty, the natural reaction is to scrub harder.
But more force isn’t always better.
If you’re dealing with mineral deposits, aggressive scrubbing can waste a lot of time without solving the underlying problem. Worse, using harsh abrasives incorrectly can damage the surface.
A better approach is to identify the type of buildup first.
Once you know that you’re dealing with hard-water minerals or another stubborn deposit, you can choose a cleaning method that is designed to address that particular problem.
That’s much more effective than simply increasing the amount of effort.
What About Bleach?
Bleach has an important place in household cleaning and disinfection when used according to its label directions, but it isn’t necessarily the right solution for removing a hardened mineral ring.
A disinfectant and a mineral-deposit remover aren’t necessarily doing the same job.
If the yellow ring is primarily mineral buildup, using more bleach doesn’t automatically make the deposit disappear.
Most importantly, never mix bleach with vinegar, acids, ammonia, or other household cleaning products.
Mixing cleaning chemicals can create dangerous fumes or other hazardous reactions.
Use one product at a time and follow the label carefully.
Don’t Forget the Toilet Rim
Once the obvious yellow ring is gone, take a few extra minutes to inspect the rim and other hidden areas.
The underside of the toilet rim can collect residue and mineral buildup that isn’t immediately visible.
A regular toilet brush can help with accessible areas, while a small cleaning brush can be useful for narrow spaces.
This is also a good time to inspect the hinges around the toilet seat.
Those tiny areas can collect dust, moisture, and residue and are often ignored during quick bathroom cleanups.
Clean the Toilet Base Too
Another area that can make a clean toilet look dirty is the base.
Dust, hair, moisture, cleaning residue, and other debris can accumulate where the toilet meets the floor.
Wipe around the entire base and pay particular attention to the area directly behind the toilet.
This small step can make a surprisingly noticeable difference.
If you’re already deep-cleaning the toilet bowl, there’s little reason to stop before finishing the outside.
How to Keep the Yellow Ring From Coming Back
Removing a stubborn ring is satisfying, but preventing another one from forming is even better.
The easiest strategy is consistency.
You don’t necessarily need to spend a long time cleaning the bathroom every day. A few minutes of regular maintenance can prevent deposits from becoming thick and difficult to remove.
Try to:
- Clean the toilet regularly instead of waiting until stains become obvious.
- Pay attention to the waterline.
- Clean beneath the rim when appropriate.
- Wipe the seat, hinges, handle, and exterior surfaces.
- Keep the area around the toilet dry and clean.
- Address hard-water buildup before it becomes heavily established.
- Follow the toilet manufacturer’s cleaning recommendations.
If you live in an area with particularly hard water, you may notice mineral deposits returning faster than expected.
In that situation, regular maintenance becomes even more important.
What If the Stain Keeps Coming Back?
If you’ve cleaned the toilet thoroughly but the same discoloration repeatedly returns, consider whether the water itself may be contributing to the problem.
Hard water can continuously introduce minerals into the bowl.
Iron-rich water can also produce recurring orange or brown discoloration.
In some cases, addressing the water quality may be more useful than repeatedly fighting the same stain.
If the problem is severe throughout the home, a plumbing or water-treatment professional may be able to help identify the source.
The important thing is not to assume that every recurring stain is simply caused by poor cleaning.
Sometimes the water is part of the problem.
A Few Simple Mistakes to Avoid
There are several mistakes that can turn a simple cleaning job into a frustrating one.
Using a Dry Pumice Stone
Don’t do it.
Keep the stone wet and keep the porcelain wet.
Using the Wrong Type of Pumice
A personal-care pumice stone isn’t automatically suitable for toilet cleaning.
Choose a product specifically intended for the surface you’re cleaning.
Applying Too Much Pressure
If a deposit isn’t coming off immediately, don’t assume you need to push harder.
Add water, slow down, and work gradually.
Using Abrasives on Delicate Surfaces
Not every toilet surface is the same.
Check the manufacturer’s instructions before using an abrasive cleaning method.
Mixing Cleaning Products
This is one of the most important safety rules.
Don’t combine bleach with vinegar, ammonia, acids, or other cleaners. Follow product labels and use cleaners separately.
The Difference a Small Cleaning Job Can Make
The funny thing about a toilet ring is how much attention it attracts.
You might clean the entire bathroom and still find yourself staring at that one yellow line.
Once it’s gone, however, the whole bathroom can suddenly look fresher.
The porcelain looks brighter. The toilet appears cleaner. The room feels more maintained.
And you realize that the problem wasn’t necessarily that the toilet was filthy.
It was that one stubborn layer of buildup had been allowed to remain long enough to become noticeable.
That’s why understanding the cause of the stain matters.
Instead of endlessly scrubbing, you can choose a method that actually targets the buildup.
Final Thoughts
That gross yellow ring doesn’t have to be a permanent feature of your toilet.
In many cases, the discoloration is connected to mineral deposits, hard water, rust-related staining, or residue that has accumulated over time. Ordinary toilet cleaner can be useful for routine maintenance, but it may not be enough when you’re dealing with hardened mineral buildup.
For a compatible glazed porcelain toilet, a wet toilet-cleaning pumice stone can provide a practical way to tackle stubborn deposits. The key is using the correct product, keeping everything wet, working gently, and checking the manufacturer’s recommendations before you begin.
The biggest lesson is that cleaning smarter is often better than cleaning harder.
You don’t need to spend hours attacking the same stain with increasing amounts of force. Take a moment to figure out what caused the buildup, choose an appropriate method, and give the process enough time.
And once you’ve finally removed that stubborn ring, don’t wait for it to become a major problem again.
A few minutes of regular cleaning can prevent small deposits from becoming thick, ugly buildup later.
Sometimes the most satisfying household improvements aren’t expensive renovations or complicated projects.
Sometimes it’s simply looking down at a toilet that used to have an embarrassing yellow ring, seeing clean white porcelain again, and thinking:
Finally. That thing is gone.