
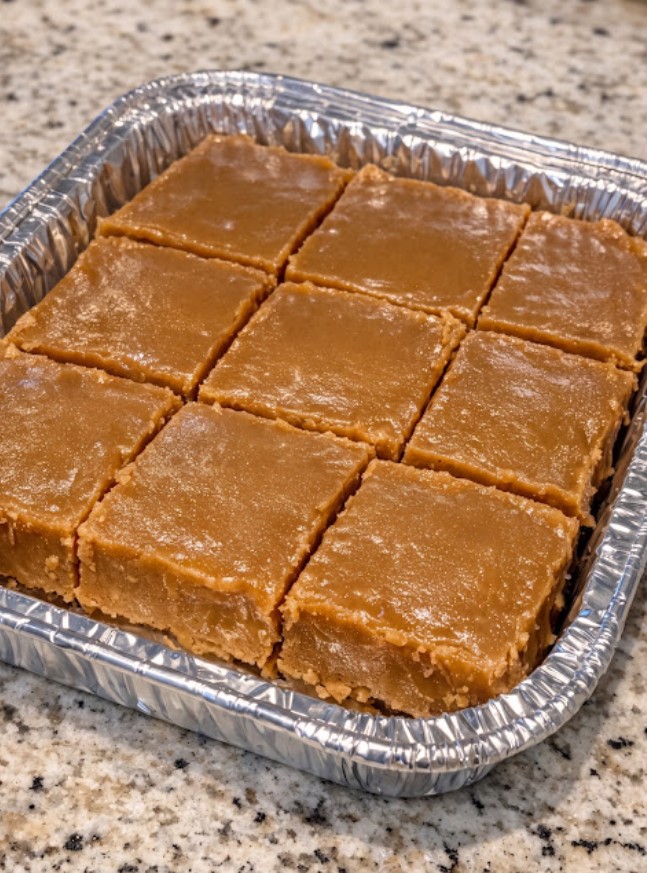
Some of the most memorable homemade desserts are made with simple ingredients that have been sitting in the kitchen cupboard for years. This 3-Ingredient Depression Era Brown Sugar Fudge is a wonderful example of how a few everyday staples can be transformed into a rich, sweet treat with an old-fashioned flavor.
Inspired by the resourceful cooking traditions associated with the Great Depression, this recipe keeps things simple without sacrificing the comforting taste of homemade candy. Brown sugar provides a deep sweetness with hints of molasses and caramel, butter adds richness, and milk helps create the smooth, creamy texture that makes fudge so enjoyable.
Unlike many modern fudge recipes that call for chocolate chips, condensed milk, or marshmallow creme, this version relies on just three basic ingredients. It does, however, require a little patience and attention during cooking. Reaching the correct temperature and allowing the mixture to cool before beating are essential steps in achieving fudge that sets properly.
This old-fashioned brown sugar fudge is perfect for holiday dessert trays, homemade gifts, family gatherings, or those afternoons when you want something sweet without making an elaborate dessert. Cut it into small squares, arrange the pieces on a serving plate, and enjoy a nostalgic treat that proves simple recipes can still be special.
If you love traditional sweets and easy homemade candy, this three-ingredient recipe is well worth trying.
Why You’ll Love This 3-Ingredient Brown Sugar Fudge
- Only three basic ingredients: You need brown sugar, butter, and milk to make the basic recipe.
- Rich caramel-like flavor: Brown sugar gives the fudge a warm, molasses-like sweetness that pairs beautifully with butter.
- No chocolate required: This recipe offers a delicious alternative to traditional chocolate fudge.
- Perfect for sharing: Small squares make lovely additions to dessert platters, holiday celebrations, and homemade food gifts.
- An old-fashioned homemade treat: The simple ingredient list and traditional stovetop method bring a nostalgic touch to your kitchen.
Ingredients You’ll Need
This recipe uses three everyday ingredients to create a small batch of sweet brown sugar fudge.
Ingredients
- 2 cups packed light brown sugar
- 1/2 cup unsalted butter
- 1/2 cup whole milk
Optional Additions
The original three-ingredient version is delicious on its own, but you can add a little extra flavor if desired.
- A small pinch of salt to balance the sweetness
- 1/2 teaspoon vanilla extract for a warmer, more rounded flavor
Keep in mind that adding these optional ingredients means the recipe will no longer contain exactly three ingredients.
A Few Ingredient Tips
Brown sugar: Light brown sugar creates a gentle caramel flavor. Dark brown sugar can be used for a deeper molasses taste, although the final flavor and texture may vary slightly.
Butter: Unsalted butter makes it easier to control the overall flavor. If you only have salted butter, you can use it and skip the optional added salt.
Milk: Whole milk provides richness and helps form the fudge mixture. Measure it carefully because the balance between sugar, butter, and liquid affects how the finished candy sets.
How to Make 3-Ingredient Depression Era Brown Sugar Fudge
This traditional fudge is made on the stovetop. The ingredients are simple, but the cooking technique is important, so prepare your pan and measure everything before you begin.
Step 1: Prepare the Pan
Line an 8-inch square baking pan with parchment paper, leaving some paper hanging over two opposite sides. These overhanging edges will make it easier to lift the finished fudge out of the pan.
If desired, lightly butter the parchment paper to help prevent sticking.
Set the prepared pan aside while you cook the mixture.
Step 2: Combine the Ingredients
Place the brown sugar, butter, and whole milk in a heavy-bottomed saucepan.
Set the saucepan over medium heat and stir gently as the butter melts and the sugar begins dissolving. Scrape the bottom and corners of the pan to help prevent the mixture from sticking or scorching.
Continue heating until the ingredients are combined and the mixture begins to boil.
A heavy-bottomed saucepan is particularly helpful because it distributes heat more evenly, reducing the risk of burning the sugar.
Step 3: Cook Until the Correct Temperature
Once the mixture reaches a steady boil, watch it carefully.
For traditional fudge, the mixture generally needs to reach the soft-ball stage, approximately 235–240°F (113–116°C). A candy thermometer is the most reliable way to check the temperature.
Avoid vigorous stirring once the mixture is boiling, as excessive agitation can encourage unwanted sugar crystallization.
If you do not have a candy thermometer, you can use the traditional cold-water test. Carefully drop a small amount of the mixture into a bowl of cold water. At the soft-ball stage, it should form a soft, flexible ball that flattens when removed from the water.
Be extremely careful when working with boiling sugar because it can cause serious burns. Keep children away from the stove and never taste the mixture while it is hot.
Step 4: Let the Mixture Cool
When the mixture reaches the appropriate temperature, remove the saucepan from the heat.
Allow it to cool without stirring until it is warm rather than piping hot. Traditional fudge is often allowed to cool to approximately 110°F (43°C) before beating, although the precise temperature can vary.
This cooling period is important because it helps prepare the mixture for the crystallization process that gives fudge its characteristic texture.
Avoid rushing this stage. Beating the mixture while it is still too hot may affect the final consistency and make it difficult to achieve the desired result.
Step 5: Beat Until Thick
Once the mixture has cooled sufficiently, use a sturdy wooden spoon to beat it.
Continue beating until the mixture becomes thicker, less glossy, and begins to hold its shape. This may take several minutes, depending on the temperature and the mixture’s consistency.
As the fudge thickens, you will notice that it becomes increasingly difficult to stir.
Pay attention to its appearance rather than relying only on the amount of time you have spent beating. You want the mixture to be thick enough to hold its shape but still soft enough to spread into the prepared pan.
Step 6: Transfer the Fudge to the Pan
As soon as the mixture thickens, work quickly to transfer it to the prepared baking pan.
Use a spatula to spread it evenly and smooth the surface. Traditional fudge can firm up rapidly at this stage, so avoid spending too much time trying to make the top perfectly smooth.
If you are adding chopped nuts or another optional ingredient, incorporate it just before transferring the fudge to the pan.
Step 7: Allow the Fudge to Set
Leave the pan at room temperature until the fudge becomes completely firm.
Depending on the room temperature and the consistency of the mixture, this may take several hours.
Avoid cutting the fudge before it has fully set, as the pieces may crumble or lose their shape.
Once firm, use the parchment paper to lift the fudge out of the pan. Place it on a cutting board and slice it into small squares with a sharp knife.
Arrange the pieces on a serving plate and enjoy your homemade brown sugar fudge.
Tips for Making Smooth, Creamy Brown Sugar Fudge
Old-fashioned fudge can be sensitive to cooking temperature and technique. These practical tips can help you achieve better results.
Use a heavy-bottomed saucepan. Even heat distribution helps reduce the risk of scorching and makes it easier to control the cooking process.
Measure the ingredients carefully. The balance of sugar, butter, and milk affects the texture. Avoid making untested changes to the quantities.
Use a candy thermometer when possible. Reaching the correct temperature is one of the most important parts of traditional fudge making.
Allow the mixture to cool before beating. Cooling helps the sugar crystallization process develop properly and contributes to the finished texture.
Avoid stirring excessively during cooling. Premature crystallization can lead to grainy fudge. Follow the cooking and cooling stages carefully.
Transfer the mixture quickly once it thickens. Fudge can become difficult to spread if it firms up inside the saucepan.
Be patient. If your first batch is softer or firmer than expected, review the cooking temperature, ingredient measurements, and beating time before trying again.
Easy Variations to Try
Once you are comfortable with the basic recipe, you can experiment with a few simple additions.
Vanilla Brown Sugar Fudge
Add 1/2 teaspoon of vanilla extract after removing the saucepan from the heat. Stir it in carefully before the mixture cools completely.
Vanilla complements the brown sugar and butter, creating a warm, familiar flavor.
Nutty Brown Sugar Fudge
Fold in a small handful of chopped pecans or walnuts just before transferring the fudge to the pan.
The nuts add a pleasant crunch and contrast with the soft texture of the candy.
Salted Brown Sugar Fudge
Add a small pinch of salt to balance the sweetness and highlight the buttery, caramel-like notes.
If you use salted butter, taste a small cooled piece before deciding whether additional salt is necessary.
Dark Brown Sugar Fudge
Replace the light brown sugar with dark brown sugar for a deeper molasses flavor.
Because brown sugar varieties can differ in moisture and molasses content, the finished texture may vary slightly. Follow the cooking temperature carefully.
How to Store Brown Sugar Fudge
Proper storage helps preserve the texture and flavor of your homemade fudge.
Once the fudge has completely set, cut it into squares and place the pieces in a clean, airtight container.
At room temperature: Keep the container in a cool, dry place. Because this recipe contains milk, refrigeration is the more cautious option if the storage conditions or safety of the finished candy are uncertain.
In the refrigerator: Store the fudge in an airtight container to prevent it from drying out or absorbing odors from other foods. Let individual pieces lose some of their chill before serving if you prefer a softer texture.
In the freezer: For longer storage, wrap the pieces securely or separate layers with parchment paper in a freezer-safe container. Thaw the fudge while covered to help minimize condensation.
Always use clean utensils when handling the finished candy, and discard any pieces that develop unusual odors, visible mold, or other signs of spoilage.
Frequently Asked Questions
Why didn’t my brown sugar fudge set?
The mixture may not have reached the correct cooking temperature, or it may not have been beaten sufficiently after cooling. Ingredient measurements and humidity can also affect the result.
Chilling the fudge may make it firmer temporarily, but it will not necessarily correct a mixture that was cooked improperly.
Why is my fudge grainy?
Graininess often occurs when sugar crystals form too early or grow too large. Stirring at the wrong stage, beating the mixture while it is too hot, or leaving undissolved sugar crystals on the sides of the saucepan can contribute.
Follow the cooking and cooling stages carefully to help produce a smoother texture.
Can I make this fudge without a candy thermometer?
Yes. The cold-water soft-ball test is a traditional alternative, although it takes practice to judge the results accurately.
If you are new to making homemade candy, a candy thermometer is generally the more consistent option.
Can I use salted butter?
Yes, salted butter can work in this recipe. The finished fudge may have a slightly saltier flavor, so omit any optional added salt unless you determine that it needs more.
Can I use evaporated milk instead of whole milk?
Evaporated milk has a different concentration and composition from regular milk, so substituting it may change the texture and cooking behavior. For the most predictable result, use whole milk as specified in the recipe.
Is this an authentic Depression-era recipe?
This version is inspired by economical, pantry-based cooking associated with the Great Depression. However, recipes varied considerably between households, and this particular three-ingredient formula should not be treated as the single definitive historical version.
How should I cut the fudge neatly?
Wait until the fudge is completely set before cutting it. Use a sharp knife and wipe the blade clean between cuts if the mixture sticks.
Cutting the fudge into small, even squares also makes it easier to serve and store.
Conclusion :
This 3-Ingredient Depression Era Brown Sugar Fudge is a lovely reminder that a satisfying homemade dessert does not always require an extensive ingredient list or expensive specialty products.
With brown sugar, butter, and milk, you can create a sweet treat with a rich, caramel-like flavor and a nostalgic old-fashioned appeal. The short ingredient list makes the recipe approachable, while the traditional stovetop method offers an opportunity to learn the techniques behind homemade candy.
The most important part is paying attention to the cooking temperature, allowing the mixture to cool properly, and beating it until it reaches the right consistency. These steps help determine whether the finished fudge will set into neat, creamy squares.
Serve it during the holidays, share it with friends and family, or keep a small batch for an occasional sweet treat. You can also experiment with vanilla, nuts, or a touch of salt once you have mastered the original version.
Although the recipe is simple, it rewards patience and careful preparation. With a little practice, this old-fashioned brown sugar fudge can become a welcome addition to your collection of homemade desserts.