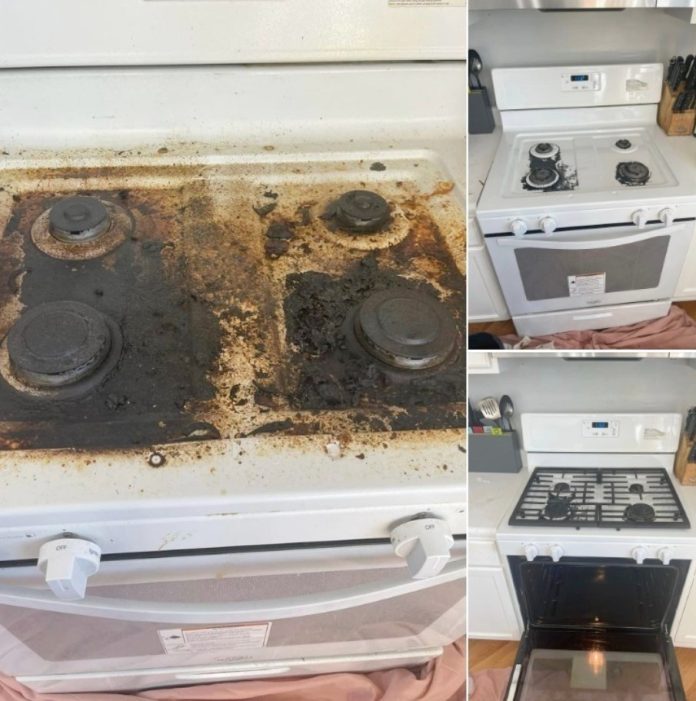
Maintaining a spotless stove and oven can feel like an uphill battle, especially when faced with stubborn grease and grime. But achieving a glossy, pristine stovetop doesn’t require harsh chemicals or expensive cleaning products. With the right DIY oven cleaner, you can restore your stove’s original shine using natural, everyday ingredients.
This comprehensive guide provides you with an easy-to-follow recipe that is safe, effective, and environmentally friendly. Say goodbye to toxic fumes and hello to a sparkling kitchen!
Why Choose a DIY Oven Cleaner?
Commercial cleaners often contain harsh chemicals that can irritate your skin, harm the environment, and leave behind unpleasant odors. A homemade oven cleaner, on the other hand, is:
- Non-toxic: Perfect for households with children or pets.
- Affordable: Made with ingredients you likely already have at home.
- Effective: Tackles even the most stubborn stains and grease.
With a little elbow grease and this natural solution, your stove will shine like new without any harmful side effects.
What You’ll Need:
- 1 cup baking soda
- 1/2 cup white vinegar
- 1 tablespoon dish soap
- 2 teaspoons lemon juice
- 5 cups hot water
- 1 sponge or microfiber cloth
- 1 misting spray bottle
These ingredients work together to create a powerhouse cleaning solution. Baking soda acts as a gentle abrasive, vinegar and lemon juice dissolve grease, and dish soap lifts stubborn grime. The hot water helps activate these components for maximum effectiveness.
Step-by-Step Instructions:
Step 1: Prepare the Oven
Before you begin, ensure your oven is completely cool. Remove any loose debris, crumbs, or large spills using a dry brush or a vacuum. This step ensures the cleaning solution can directly target stubborn stains without interference.
Step 2: Mix the Cleaning Solution
In a large bowl, combine baking soda, white vinegar, dish soap, lemon juice, and hot water. Stir the mixture thoroughly until all ingredients are well incorporated. The solution will fizz slightly as the baking soda and vinegar react—this is normal and signals the activation of the cleaning agents.
Step 3: Apply the Cleaner
Pour the solution into a misting spray bottle for easy application. Generously spray the inside of your oven, focusing on areas with heavy grease or baked-on stains. For extra stubborn spots, make a paste by reducing the water content in the mixture and apply it directly to those areas.
Step 4: Let It Soak
Allow the solution to sit on the surface for 15 to 20 minutes. This soaking period lets the natural cleaning agents break down grime and grease, making them easier to remove.
Step 5: Scrub Away Grime
Using a sponge or microfiber cloth, scrub the surfaces in circular motions. Apply moderate pressure on tough stains, but avoid using abrasive tools that could scratch your oven. Baking soda provides gentle scrubbing power, while the lemon juice and vinegar cut through grease.
Step 6: Rinse Thoroughly
Dampen a clean cloth or sponge with warm water and wipe away any residue from the cleaner. It’s important to ensure all cleaning solution is removed to prevent streaks or buildup.
Step 7: Dry the Surface
Pat the cleaned surfaces dry with a fresh towel or cloth. Allow the oven to air dry completely before using it again.
Step 8: Clean the Oven Racks
Remove the oven racks and soak them in a sink filled with warm water and dish soap. Let them sit for at least an hour to loosen grime. Use a scrub brush or sponge to clean off any remaining residue, rinse thoroughly, and dry before placing them back in the oven.
Tips for Maintenance:
- Regular Wipe-Downs: To prevent grease buildup, wipe down your stovetop and oven after each use with a damp cloth.
- Monthly Deep Clean: Schedule a thorough cleaning session every month using this DIY cleaner to keep your stove in pristine condition.
- Spot Clean Spills: Address spills immediately to avoid hard-to-remove stains later.
- Keep a Spray Bottle Handy: Store a diluted version of this cleaning solution in a spray bottle for quick touch-ups.
- Protect Your Surfaces: Use oven liners or baking mats to catch drips and spills during cooking.
The Science Behind the Cleaner
- Baking Soda: A natural deodorizer and gentle abrasive, baking soda tackles stuck-on residue without scratching surfaces.
- White Vinegar: Its acidic nature dissolves grease and kills bacteria, leaving your oven hygienically clean.
- Dish Soap: Breaks down grease and lifts it from surfaces.
- Lemon Juice: Adds extra degreasing power and a refreshing citrus scent.
- Hot Water: Helps to activate the cleaning agents and loosen grime.
Why This Recipe Works
This DIY oven cleaner combines multiple cleaning agents that work in harmony. The bubbling reaction between baking soda and vinegar lifts stubborn grime, while dish soap and lemon juice cut through grease. Together, these ingredients create a powerful, natural alternative to chemical-based cleaners. Plus, the process is simple enough to incorporate into your regular cleaning routine.
Conclusion:
Cleaning your stove doesn’t have to be a dreaded chore. With this DIY oven cleaner, you can achieve sparkling results while protecting your family from harmful chemicals. By incorporating natural ingredients like baking soda, vinegar, and lemon juice, you’re not only saving money but also promoting a healthier, eco-friendly lifestyle. Regular cleaning and maintenance will keep your stove looking new for years to come. So, roll up your sleeves and give this recipe a try—your kitchen will thank you for it!


