
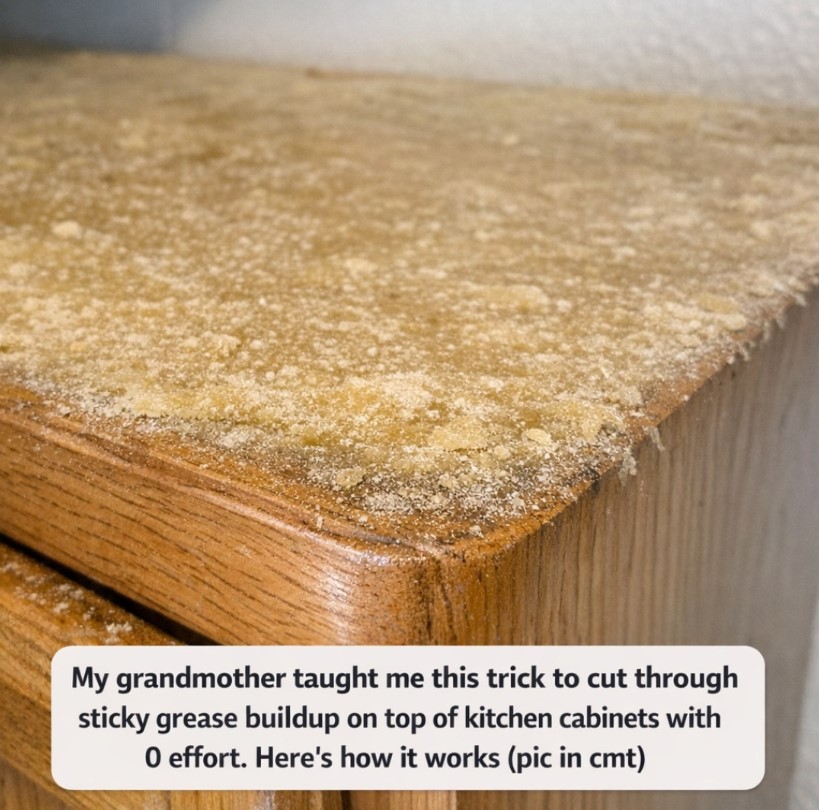
If your kitchen cabinets don’t reach all the way to the ceiling, there is a good chance the space above them has become one of the most overlooked cleaning areas in your home.
From the floor, everything may look perfectly clean. But climb onto a step stool and take a closer look, and you may discover a layer of sticky dust, cooking grease, and grime covering the tops of the cabinets.
The worst part is that this buildup can become incredibly stubborn.
It isn’t ordinary dust that can simply be wiped away with a dry cloth. Cooking oils can float through the air and settle on high surfaces, where dust quickly sticks to the greasy film. Over time, the combination can turn into a tacky coating that feels almost like glue.
Fortunately, you don’t necessarily need a powerful commercial degreaser or hours of exhausting scrubbing.
A simple method passed down from my grandmother uses warm water, a small amount of dish soap, and a little white vinegar to soften the buildup before you wipe it away. The key isn’t scrubbing harder—it’s giving the cleaning solution enough time to loosen the grime first.
Why the Tops of Kitchen Cabinets Get So Greasy
You may wonder how cabinet tops become so dirty when nobody touches them.
The answer is your cooking.
Whenever you fry, sauté, roast, or simmer food, tiny particles of oil and grease can become airborne. Some of that residue eventually settles onto nearby surfaces.
Because the tops of cabinets are usually out of sight and difficult to reach, they often don’t get cleaned as frequently as countertops, stovetops, or cabinet doors.
Dust then lands on the oily surface and sticks to it.
Over time, layer after layer builds up until the once-invisible film becomes a thick, grayish or brownish coating.
In a frequently used kitchen, especially one without strong ventilation, this can happen much faster than you might expect.
The Old-Fashioned Trick: Soften Before You Scrub
My grandmother’s approach was wonderfully simple.
Instead of attacking hardened grease with a dry cloth or immediately reaching for a harsh cleaner, she would first soften the buildup.
Her basic cleaning mixture combines:
- 2 cups of very warm water
- 1 teaspoon of liquid dish soap
- 1 tablespoon of white vinegar
For particularly greasy areas, the dish soap can be increased slightly, but there is no need to make the mixture extremely concentrated.
The dish soap is the main grease-cutting ingredient. The warm water helps soften the residue, while the vinegar can help break through the dull film left behind by grease and dust.
The most important part, however, is patience.
Instead of scrubbing immediately, allow the damp solution to sit on the buildup for about five to ten minutes. This gives the residue time to loosen so that it can be wiped away much more easily.
What You’ll Need
You don’t need a cabinet full of specialized cleaning products.
Gather a few simple supplies before you begin:
- A sturdy step stool
- Two microfiber cloths
- A soft sponge
- A small bowl or spray bottle
- Warm water
- Liquid dish soap
- White vinegar
- A dry towel or paper towels
- An old plastic spatula or plastic scraper
Microfiber cloths are particularly useful because they can pick up greasy dust rather than simply pushing it from one spot to another.
For very thick buildup, damp paper towels can also be useful. Laying them directly over the greasy area allows the moisture and warmth to work on the residue for several minutes before wiping.
Always Test the Cleaner First
Before applying any homemade cleaning mixture across the entire cabinet top, test it in a small, hidden area.
This is especially important if your cabinets are made from painted wood, stained wood, laminate, MDF, or have an older finish.
Apply a small amount of the solution, let it sit briefly, wipe it away, and check the surface.
If the finish looks unchanged, you can continue carefully.
Some cabinet finishes don’t respond well to prolonged moisture or acidic cleaners. If you suspect the surface is delicate, using warm water with just a tiny amount of dish soap—and skipping the vinegar—may be the safer option.
The goal is to remove grease without damaging the finish underneath it.
Step 1: Remove Everything From the Cabinet Tops
Before cleaning, take down any decorations, baskets, plants, or other objects sitting above the cabinets.
This gives you a completely clear working area.
It also prevents you from accidentally getting cleaning solution on items that shouldn’t be exposed to it.
Once everything is removed, take a dry cloth or paper towel and lightly remove loose dust.
Don’t scrub aggressively at this stage.
If you rub too hard, you may push the dry dust deeper into the greasy layer and make the surface even more difficult to clean.
Step 2: Prepare the Warm Cleaning Solution
Mix the warm water, dish soap, and vinegar in a bowl or spray bottle.
The water should be warm enough to help soften the grease, but it doesn’t need to be boiling or extremely hot.
Remember that you don’t need a huge amount of soap.
Using too much dish detergent can actually create another problem because leftover soap can leave behind a film that attracts dust.
A small amount is usually enough.
Step 3: Dampen, Don’t Soak
Dip your microfiber cloth or soft sponge into the mixture.
Then wring it out thoroughly.
This part is important.
You want the cloth to be damp rather than dripping wet.
Excess water can run over the edge of the cabinet, seep into seams, or reach areas where moisture could damage wood or loosen trim.
Work in manageable sections rather than trying to soak the entire cabinet top at once.
For particularly stubborn areas, place damp paper towels over the grease and leave them there for five to ten minutes.
This gives the solution time to soften the sticky residue.
Step 4: Let the Solution Do the Hard Work
This is where the trick really saves effort.
Once the surface is damp, don’t immediately start scrubbing.
Give the mixture several minutes to work.
The warmth and soap help loosen the greasy coating, making it much easier to remove.
After the waiting period, use a microfiber cloth to wipe the surface in long, steady passes.
Working from the back toward the front can help prevent you from accidentally spreading dirty residue back across areas you’ve already cleaned.
As your cloth becomes dirty, refold it and use a clean section.
That simple habit can make a surprisingly big difference.
Step 5: Deal With Really Thick Grease
Sometimes the buildup is much worse than an ordinary sticky film.
If years of grease and dust have accumulated above the cabinets, the first pass may only remove the outer layer.
Don’t assume the method isn’t working.
Simply apply the warm solution again and allow it to sit for another few minutes.
Once the grime has softened, a plastic spatula or plastic scraper can help lift thicker sections.
Hold it at a low angle and work gently.
Never use a sharp metal scraper or knife.
A metal tool can scratch the finish, cut into the surface, or permanently damage the cabinet.
Once the thick residue has been lifted, use a damp microfiber cloth to remove what remains.
What About Baking Soda?
Baking soda can sometimes help with a stubborn patch, but it doesn’t necessarily need to be the first thing you use.
If a small area remains sticky after cleaning with the warm soap solution, you can make a loose paste using a little baking soda and water.
Apply it gently to the remaining spot, allow it to sit briefly, and wipe it away.
However, baking soda is mildly abrasive.
That means aggressive scrubbing with it could dull glossy painted finishes or damage delicate surfaces.
It may be more appropriate for tougher laminate surfaces, while delicate wood or painted cabinets should receive a gentler treatment.
The Biggest Mistake: Using Too Much Water
When something is extremely dirty, it can feel natural to assume that more water will make cleaning easier.
With kitchen cabinets, that can be a mistake.
Water can seep into seams and unfinished edges. On wood, excess moisture can contribute to swelling or damage.
It can also run down the cabinet fronts and leave streaks.
For that reason, thoroughly wring out your cloth and clean the surface in small sections.
Clean one area, wipe it dry, and then move on to the next.
It may take slightly longer, but it gives you better control and protects the cabinet finish.
Give the Cabinets a Final Rinse
Once all the grease has been removed, don’t stop immediately.
Take a fresh cloth, dampen it with plain warm water, and gently wipe the surface again.
This removes any remaining soap or vinegar residue.
Then dry the cabinet top completely with a clean towel.
That final drying step is important because leftover cleaner can leave a film that attracts dust and grime more quickly.
The goal is to finish with a clean, dry surface rather than simply moving the grease around.
Make Future Cleaning Much Easier
Once you’ve gone through the trouble of getting the cabinet tops clean, there is a simple way to make future maintenance easier.
Consider placing a protective liner over the top.
Plain kraft paper, newspaper, or a thin shelf liner can be cut to fit the space.
Instead of allowing grease and dust to accumulate directly on the cabinet surface, the liner catches much of the mess.
When it becomes dirty, you can simply remove it and replace it.
Replacing the liner every few months can make future cleanups dramatically easier.
How Often Should You Clean Up There?
The ideal cleaning schedule depends on how often you cook.
If you only cook a few times each week, checking the cabinet tops every few months may be enough.
If you cook every day, frequently fry foods, or have a kitchen with limited ventilation, you may want to inspect them every month or two.
The important thing is not to let a thin film become a thick layer.
A quick wipe when the grease is still relatively fresh is much easier than trying to remove months or years of hardened residue.
Regular maintenance can turn a frustrating cleaning project into a quick routine.
Your Range Hood Can Make a Huge Difference
One of the best ways to reduce greasy cabinet buildup isn’t a cleaning product at all.
It’s ventilation.
If your range hood vents outdoors, use it whenever you cook, particularly when frying, searing, or preparing foods that produce a lot of steam and airborne grease.
Turning the hood on before the cooking surface becomes very hot can help capture airborne particles earlier.
It can also be useful to leave it running for several minutes after you finish cooking.
If your hood recirculates air instead of venting outdoors, keep its filter clean and replace it according to the manufacturer’s instructions. A dirty filter cannot capture grease as effectively.
Be Careful With Different Cabinet Materials
Not every cabinet should be cleaned in exactly the same way.
Laminate and factory-finished surfaces are generally easier to maintain.
Older painted cabinets, worn wood finishes, MDF, and unsealed decorative trim may require more caution.
For delicate surfaces, use less moisture, keep the contact time short, and dry immediately.
If you aren’t sure how your cabinet finish will react, always test a hidden spot first.
When in doubt, a small amount of mild dish soap diluted in warm water is a gentler starting point than a stronger cleaning solution.
The Quickest Version of the Trick
If you want the simplest possible version of this grandmother-approved method, remember these four steps:
Warm water + a little dish soap → dampen the greasy area → wait about five minutes → wipe and dry.
You don’t necessarily need expensive cleaning products.
The secret is allowing the solution to soften the grease before you start scrubbing.
That’s what turns a frustrating job into a much easier one.
Why This Simple Method Works So Well
There’s something appealing about old-fashioned cleaning advice.
Modern kitchens are filled with specialized sprays, wipes, degreasers, and cleaning gadgets, and some of them can certainly be useful.
But sometimes the simplest method is enough.
This approach focuses on a basic principle: soften first, loosen second, wipe third.
Instead of exhausting yourself trying to force hardened grease off a surface, you give the cleaning solution time to do some of the work for you.
That’s likely the most useful lesson behind the grandmother’s trick.
You don’t always need to scrub harder.
Sometimes you simply need to let the cleaner sit a little longer.
Conclusion
The tops of kitchen cabinets may be one of the easiest places in the house to forget, but they can quietly collect an impressive mixture of cooking grease and dust.
Fortunately, you don’t need to spend hours scrubbing away at hardened buildup.
A simple mixture of warm water, a small amount of dish soap, and a little white vinegar can help soften the sticky residue before you wipe it away. The real secret is patience: give the solution several minutes to loosen the grease instead of immediately attacking it with force.
For especially thick buildup, repeat the process and use a plastic scraper gently rather than reaching for anything sharp. Always test your cleaning solution on an inconspicuous area first, especially when working with older or delicate cabinet finishes.
Once the cabinets are clean, a simple liner can help prevent future buildup, while good kitchen ventilation can reduce the amount of airborne grease settling on those hard-to-reach surfaces.
Perhaps the best lesson from this old-fashioned cleaning trick is that more effort doesn’t always mean better results.
Sometimes the smartest approach is to let warmth, soap, and a little patience do the hard work for you.
And if your grandmother taught you a cleaning trick like this one, there’s a good chance it deserves another place in your cleaning routine.