
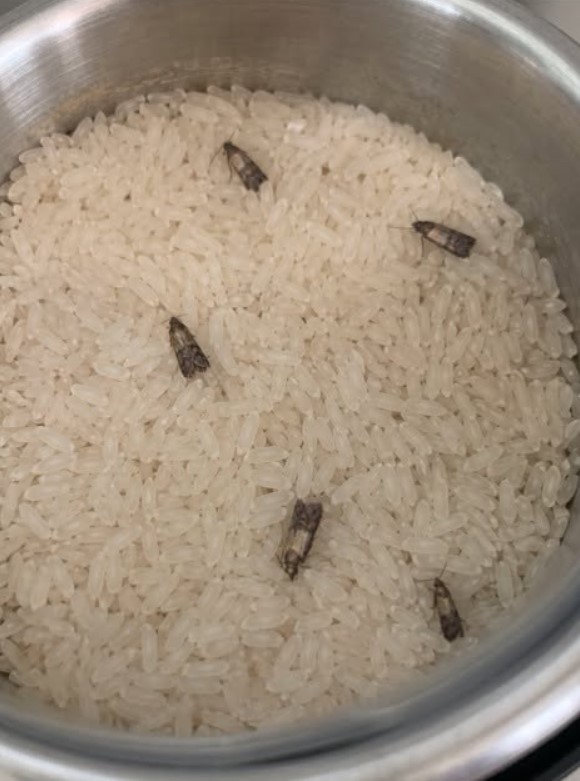
If you have ever opened a kitchen cabinet and suddenly noticed a tiny moth fluttering out, you probably know that unpleasant feeling that follows. At first, it may seem like a harmless little insect that somehow wandered inside. But when you see another one a few days later—or discover fine webbing inside a bag of flour or cereal—you may realize that there is a much bigger problem hiding in your pantry.
Pantry moths can be surprisingly difficult to eliminate because the adult moths you see flying around are only one part of the problem. The larvae are usually responsible for damaging stored food, and eggs or pupae can remain hidden in cracks, corners, shelf brackets, and other quiet areas of your cabinets.
The good news is that pantry moths can be controlled. You do not necessarily need a cabinet full of specialized pest-control products. The most important thing is to find where the infestation is coming from, remove contaminated food, clean the pantry thoroughly, and then change the way you store susceptible foods.
The key is to break the moth’s life cycle rather than simply killing the adults you happen to see flying around.
What Are Pantry Moths?
Pantry moth is a general household term used for several moth species that infest stored food. One of the most common is the Indian meal moth.
These insects are small and may appear grayish or brownish when seen from a distance. You may notice them flying around the kitchen, especially when you open a cupboard or when the room is quiet in the evening.
However, the flying adult moth is not usually the stage that is eating your food.
The larvae are the ones that feed on stored dry goods.
Female moths lay eggs in or around food sources. Once the eggs hatch, the larvae begin feeding and growing. When they mature, they can leave the food package and crawl into nearby cracks, corners, ceilings, shelf supports, or other protected areas where they eventually form pupae.
This explains why simply swatting the moths you see does not solve the problem.
If you kill five adult moths but leave an infested bag of cereal or a hidden group of larvae behind, the cycle can simply start again.
How Can You Tell If You Have Pantry Moths?
Adult moths are often the first clue, but they are not the only thing to look for.
When checking your pantry, watch for several signs of infestation.
You may find:
- Small moths flying around the kitchen
- Tiny caterpillar-like larvae
- Fine silk-like webbing inside food packages
- Grains or flour that appear clumped together
- Small holes or damage in packaging
- Cocoons or pupae around shelves and corners
- Unusual residue inside dry foods
- Food that suddenly looks or smells different
Sometimes the first indication is simply seeing a moth sitting on a kitchen wall.
When that happens, it is worth investigating instead of assuming the insect will disappear on its own.
Where Do Pantry Moths Come From?
One frustrating thing about pantry moths is that they do not necessarily indicate that your kitchen is dirty.
They can enter a home through food that was already contaminated before you purchased it. Eggs or very young larvae can be difficult to notice, especially when they are hidden inside packaging.
Once an infested product enters your pantry, the insects can spread to other suitable foods.
This is why an infestation can seem to appear out of nowhere.
A bag of flour, a box of cereal, a package of rice, or even pet food can potentially become a source of the problem.
What Foods Do Pantry Moths Infest?
Pantry moths are attracted to many common dry foods, so checking only one suspicious package is usually not enough.
Go through your pantry carefully and inspect products such as:
- Flour
- Rice
- Pasta
- Cereal
- Oatmeal
- Cornmeal
- Baking mixes
- Crackers
- Breadcrumbs
- Nuts
- Seeds
- Dried fruit
- Spices
- Chocolate
- Powdered foods
- Pet food
- Birdseed
- Other dry packaged foods
Do not forget about food stored outside the main pantry.
If you keep a large bag of dog food, cat food, birdseed, or other dry products in a garage, basement, laundry room, or another storage area, those products should also be inspected.
That forgotten bag at the back of the cupboard may be exactly where the infestation began.
What You’ll Need for a Pantry Moth Cleanout
The good news is that you can start with ordinary cleaning supplies.
Gather:
- Large trash bags
- A vacuum cleaner with a crevice attachment
- Warm water
- Mild dish soap
- Clean cloths or paper towels
- A bucket
- Airtight food-storage containers
- A flashlight
- Pantry moth pheromone traps for monitoring
A small cleaning brush or old toothbrush can also be useful for reaching narrow corners and shelf joints.
Labels and a marker are optional but helpful if you want to date your containers and keep track of older foods.
The vacuum is particularly important because eggs, larvae, and pupae may be hiding in places that are easy to overlook.
Step 1: Empty the Pantry Completely
Start by removing everything from the affected cabinet or pantry.
Do not simply move a few packages around and clean the visible areas. If you want to find the source, you need to see what is actually hiding at the back of the shelves.
Take out:
- Boxes
- Bags
- Jars
- Cans
- Bottles
- Food containers
- Pet food
- Baking supplies
- Spices
- Other stored products
Place everything somewhere where you can inspect it carefully.
As you remove each item, look at the package rather than automatically putting it into a new location.
Step 2: Inspect Every Dry Food Package
This is one of the most important parts of the entire process.
Look closely at flour, rice, cereal, pasta, oats, nuts, seeds, dried fruit, baking products, and other dry goods.
Check for:
- Fine webbing
- Small larvae
- Tiny holes
- Clumped food
- Unusual residue
- Cocoons
- Moths inside or around the package
Do not assume an unopened box is automatically safe.
Some pantry pests can be present inside packaging without being obvious from the outside.
If you find clear evidence of infestation, place the food directly into a garbage bag.
Seal the bag tightly and take it outside rather than leaving it sitting in your kitchen trash can.
Step 3: Be Careful With Questionable Food
Sometimes you will find a package that does not show obvious signs of infestation but was stored next to heavily affected food.
Use your judgment.
For inexpensive products that appear suspicious, replacing them may be simpler than taking a chance.
For products you want to keep, appropriate temperature treatment can sometimes be used to kill hidden insects. Freezing is one option for suitable dry foods, but the food should be packaged appropriately and kept frozen long enough for the treatment to be effective.
The important point is not to return questionable food to a freshly cleaned pantry without considering whether it could restart the infestation.
Step 4: Clean the Storage Containers
If you use reusable containers, empty them and clean them thoroughly.
Wash containers, lids, and seals with hot, soapy water. Pay attention to grooves, corners, threads, and other areas where tiny eggs or food particles could remain.
Allow everything to dry completely before refilling the containers.
A container that looks clean on the outside may still have residue hiding around the lid.
Taking a few extra minutes here can prevent you from accidentally putting contaminated food back into your newly cleaned pantry.
Step 5: Vacuum Every Corner of the Pantry
Once all food has been removed, vacuum the entire area.
Do not limit yourself to the middle of the shelves.
Use the crevice attachment to reach:
- Shelf corners
- Cracks
- Cabinet seams
- Shelf supports
- Door edges
- Areas underneath shelves
- Back corners
- Baseboards
- Gaps around hardware
Remember that mature larvae can leave their food source and hide elsewhere before becoming adult moths.
That means the package containing the food is not necessarily the only place you need to clean.
After vacuuming, empty the vacuum according to the manufacturer’s instructions so that insects or debris collected inside cannot remain there.
Step 6: Wash the Shelves Thoroughly
After vacuuming, wash the shelves and surrounding surfaces with warm, soapy water.
Wipe down the walls of the pantry, the underside of shelves, corners, doors, and other accessible surfaces.
A small brush or toothbrush can help loosen debris from tight spaces.
The goal is not simply to make the pantry look cleaner. You are trying to remove food particles, webbing, eggs, larvae, and other material that could allow the infestation to continue.
Let the area dry completely before putting food back.
Step 7: Don’t Forget Nearby Cabinets
One common mistake is cleaning only the cabinet where you first saw a moth.
If the infestation has been present for a while, adult moths may have had time to move around.
Inspect neighboring cabinets and shelves, particularly those containing dry foods.
Check the areas around:
- Baking supplies
- Cereal
- Pasta
- Rice
- Flour
- Snacks
- Nuts
- Pet food
- Birdseed
If you find signs of activity elsewhere, clean those areas as well.
Step 8: Use Pantry Moth Traps for Monitoring
Pheromone traps can be useful after the major cleanout.
These traps are designed to attract adult male pantry moths and can help you determine whether adult activity is still occurring.
However, a trap should not be considered the entire solution.
It may catch adults, but it does not remove an infested bag of food or eliminate eggs and larvae hidden in the pantry.
Think of the trap as a monitoring tool that helps you see whether your cleanup efforts are working.
If you continue catching moths, go back through the pantry and inspect everything again.
Step 9: Move Dry Foods Into Airtight Containers
Once the pantry is clean and the food has been inspected, rethink how you store dry goods.
Airtight glass or sturdy plastic containers are much easier to inspect than thin bags and cardboard boxes.
Transfer suitable foods into containers with secure lids and label them if needed.
This has several advantages.
You can immediately see what you have, old food is less likely to disappear into the back of the pantry, and a pest that gets into one product is less likely to move freely into other stored foods.
Keeping similar products together can also make future inspections easier.
Step 10: Keep Older Food Toward the Front
A simple organization habit can make a big difference.
When you buy a new package of flour, cereal, rice, or another dry product, place the older container where you will use it first.
This prevents food from sitting untouched for months.
A pantry that is regularly organized is much easier to inspect than one where half-used bags and forgotten boxes are stacked behind newer purchases.
Why You Should Keep Checking for Several Weeks
One thorough cleaning session may not immediately mean the problem is completely gone.
Pantry moths have multiple stages in their life cycle, and some individuals may already be hidden when you begin cleaning.
That is why continued monitoring matters.
Check your pantry regularly after the initial cleanup.
Look for:
- New adult moths
- Fresh webbing
- Larvae
- Cocoons
- Damaged packages
- Activity around corners or ceilings
If you see new activity, do not assume the cleaning failed.
Instead, use the discovery as a clue that something may have been missed.
Go back through nearby cabinets and dry foods and repeat the inspection.
How to Prevent Pantry Moths From Coming Back
Once you have dealt with an infestation, prevention becomes much easier if you build a few simple habits into your normal kitchen routine.
Store Dry Goods Properly
Whenever possible, keep susceptible dry foods in airtight containers.
This is particularly useful for products such as flour, rice, cereal, pasta, oats, nuts, and seeds.
Check New Purchases
Before putting new packages into the pantry, take a quick look at them.
Pay attention to damaged packaging, unusual webbing, or anything else that seems suspicious.
You do not need to become obsessed with every grocery item, but a few seconds of inspection can help you catch a problem before it spreads.
Keep the Pantry Organized
Avoid allowing old food to disappear behind newer products.
Regularly move things around, check expiration dates, and clean up spilled flour, cereal, rice, or other dry ingredients.
Inspect Pet Food and Birdseed
These are easy to forget.
Large bags can sit undisturbed for long periods, making them worth checking whenever you are dealing with pantry moths.
Clean Small Spills Quickly
A few grains or crumbs may not seem important, but keeping storage areas clean removes potential food sources and makes it easier to notice unusual activity.
Can Pantry Moths Really Be Eliminated?
Yes, but patience is important.
The biggest mistake is treating only the adult moths.
Seeing fewer moths does not necessarily mean the infestation is gone. The source may still be hiding inside a food package or in a forgotten corner of the pantry.
A successful cleanup usually involves several steps working together:
- Find the source.
- Remove contaminated food.
- Vacuum the pantry thoroughly.
- Wash shelves and storage areas.
- Clean reusable containers.
- Monitor adult moth activity.
- Move dry foods into airtight containers.
- Continue checking the pantry for several weeks.
Once you approach the problem this way, pantry moths become much easier to understand and manage.
When Should You Consider Professional Help?
Most household pantry moth problems can be addressed through careful inspection, food removal, cleaning, and improved storage.
However, if the infestation continues despite repeated cleaning, or if moths are appearing throughout multiple areas of the home, it may be worth contacting a qualified pest professional.
Avoid spraying insecticides directly onto food or food-contact surfaces. Always follow the label instructions for any pest-control product and keep food and food-preparation areas protected.
For many pantry infestations, thorough sanitation and removing the source are more important than simply spraying the visible insects.
Final Thoughts
Finding pantry moths in your kitchen can be frustrating, especially when you realize that the few insects flying around may represent only a small part of the problem.
The good news is that you do not have to live with them.
The most effective approach is to stop focusing only on the adult moths and instead deal with the entire infestation. Empty the pantry, inspect every dry food package, throw away contaminated products, vacuum the hidden corners, wash the shelves, clean reusable containers, and continue monitoring the area afterward.
Then make prevention part of your normal kitchen routine.
Store dry goods in airtight containers, keep older products visible, inspect new purchases, and remember to check pet food and birdseed as well.
The original article also emphasizes this same basic principle: the visible moths are not necessarily the real source of the infestation, because larvae can be developing inside stored foods and later move into hidden areas.
Once you break that cycle and make your pantry easier to inspect, you can greatly reduce the chance of facing the same frustrating problem again.
A few extra minutes of organization and regular checking can save you from having to throw away an entire pantry later.