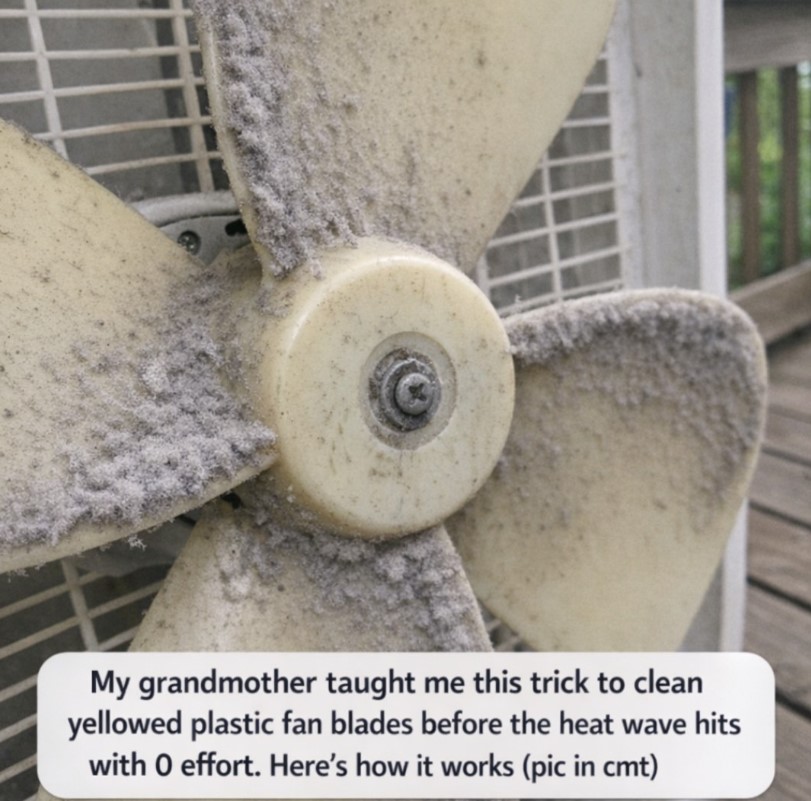
When the weather starts getting warmer, one of the first things many people do is pull their fans out of storage. After months of sitting in a closet, basement, or garage, however, those fans may look far from fresh. The plastic blades can appear yellow, dusty, or greasy, even if the appliance worked perfectly well the previous summer.
For years, I assumed that yellowed fan blades were simply a sign of age. I would wipe them with a damp cloth, scrub a little harder when the stains refused to disappear, and eventually accept that they would never look clean again.
Then my grandmother shared a simple cleaning trick that changed the way I prepare my fans for summer. Instead of spending ages scrubbing each blade, she recommended letting a gentle cleaning solution do most of the work.
Her method combines warm water, dish soap, and a small amount of 3% hydrogen peroxide. For suitable removable plastic blades, this approach can help loosen stubborn dirt, remove greasy residue, and improve the appearance of yellowed surfaces without requiring hours of hard work.
The best part is that you can prepare the cleaning solution while gathering your other supplies, let the blades soak, and use that time to clean the fan’s grille and exterior.
Of course, not every type of yellowing can be reversed, and fan manufacturers may have specific cleaning instructions. Still, this simple routine can be a useful way to refresh a dusty fan before the next heat wave arrives.
1. Why Do Plastic Fan Blades Turn Yellow?
Before cleaning yellowed fan blades, it helps to understand why their appearance changes in the first place.
Several factors can contribute to discoloration, and the cause determines how much improvement you can reasonably expect.
Dust and household grime: Fans continuously move air around a room, allowing dust and other airborne particles to settle on their surfaces. Over time, a thin layer of grime can make white plastic appear gray, beige, or yellow.
Kitchen grease: Fans used near cooking areas can collect airborne oils and grease. These sticky deposits trap additional dust and may require more than an ordinary dry wipe to remove.
Smoke and residue: Tobacco smoke, candles, and other sources of airborne residue can contribute to a yellowish film on plastic surfaces.
Sunlight and aging: Prolonged exposure to ultraviolet light, heat, and oxygen can gradually change the color of certain plastics. This type of discoloration may extend beyond the surface and can be much harder to reverse.
It is important to distinguish between dirt that has accumulated on the blades and discoloration caused by the plastic itself.
If the yellow layer is mostly surface grime, a good cleaning may make a substantial difference. If the plastic has changed color because of age or sun exposure, washing alone may not restore its original shade.
That does not mean cleaning is pointless. Removing dust and grease can still make the fan look fresher and help you inspect its condition before using it again.
2. The Simple Cleaning Trick My Grandmother Used
My grandmother’s method was based on a straightforward idea: instead of scrubbing away every bit of dirt immediately, allow the cleaning solution time to loosen it first.
The process involves removing the fan blades when the appliance is designed to allow safe removal, preparing a suitable cleaning bath, soaking the plastic components, and wiping them gently afterward.
Warm water helps loosen ordinary grime, while dish soap cuts through greasy residue. A modest amount of 3% hydrogen peroxide may help improve the appearance of certain stained surfaces, although the results depend on the plastic and the type of discoloration.
For this reason, the solution should always be tested on a small, inconspicuous area first. Check the fan’s instruction manual before using hydrogen peroxide or any other brightening product, because some plastics or finishes may react poorly.
The method is intended for removable plastic blades that can safely be cleaned separately from the motor and electrical components.
Never immerse the fan itself in water or allow liquid to enter the motor housing, switches, or electrical connections.
3. What You Need Before You Start
One advantage of this cleaning routine is that most of the supplies are inexpensive and commonly available.
For a typical cleaning session, gather the following items:
- A screwdriver, if required to remove the fan grille.
- A large plastic basin or suitable sink.
- Warm water.
- A small amount of grease-cutting dish soap.
- 3% hydrogen peroxide, if compatible with the fan’s materials and manufacturer instructions.
- A soft microfiber cloth.
- An old, soft toothbrush for narrow edges and corners.
- A clean towel for drying.
- Gloves and eye protection when recommended on the cleaning product label.
For a removable blade assembly, you can begin with approximately 1 to 1.5 gallons of warm water and a teaspoon or two of dish soap.
If the manufacturer permits the use of 3% hydrogen peroxide on the plastic, a modest starting amount may be appropriate. The original method uses about one cup for roughly 1.5 gallons of water, but the correct concentration and suitability depend on the product and the material being cleaned.
Do not assume that a stronger mixture will produce better results. More concentrated or prolonged exposure can damage certain plastics or finishes.
If you prefer to use an oxygen-based cleaning product, follow its label instructions instead. Do not combine it with hydrogen peroxide or other cleaners unless the product instructions explicitly permit that combination.
Never mix hydrogen peroxide with vinegar, chlorine bleach, ammonia, or other cleaning chemicals. Use one suitable product at a time.
4. Check Whether Your Fan Can Be Taken Apart
Not every fan is designed to have its blades removed by the user.
Many pedestal and table fans have a front grille and a central blade cap that can be removed for cleaning. Some window fans can also be disassembled, depending on their construction.
Other models have components that are difficult to access or are not intended to be removed without professional assistance.
Before reaching for a screwdriver, unplug the fan and consult its instruction manual. Look for the manufacturer’s cleaning and disassembly instructions.
If the blades can be removed safely, follow the recommended procedure without forcing any parts.
If a screw, cap, or grille refuses to move, stop and check the instructions rather than applying excessive force. Plastic fittings can crack, and damaged fan components may affect safe operation.
For a fan that cannot be disassembled, clean only the accessible surfaces using a lightly damp cloth, keeping all moisture away from the motor, switches, and electrical components.
Never attempt to soak a blade assembly while it remains attached to the motor.
5. How to Remove the Fan Blades Safely
Once you have confirmed that your fan can be disassembled, prepare a clean workspace.
Place a towel on a table or countertop to protect the surface and give yourself enough room to arrange the parts.
Start by unplugging the fan from the electrical outlet. If it has been running recently, allow it to cool completely.
Remove the front grille according to the manufacturer’s instructions. Keep the screws and other small components together in a bowl or container so they do not disappear during cleaning.
Next, examine the central blade cap or fastening mechanism. Some fans use threaded caps, while others have different locking systems. Do not assume that every model loosens in the same direction.
Follow the instructions for your particular fan and remove the blades gently.
Before placing them in the cleaning basin, brush away loose dust with a dry cloth or soft brush. This prevents excessive dust from collecting in the soaking water.
Take a moment to inspect the plastic. Look for cracks, chips, warping, or other signs of damage.
If a blade is cracked, brittle, or visibly distorted, do not use the cleaning process as a substitute for repair or replacement. A damaged blade can become a safety hazard when the fan spins.
6. Prepare the Cleaning Solution
Now comes the easy part.
Fill a suitable basin with enough warm water to cover the removable plastic blades. The water should be comfortably warm rather than hot.
Add a small amount of dish soap and stir gently until it is evenly distributed.
If the manufacturer permits hydrogen peroxide on the specific plastic, add an appropriate amount of 3% solution. The original method uses approximately one cup for 1.5 gallons of water, but you should begin conservatively and follow any applicable product guidance.
Avoid using boiling water or very hot water. High temperatures may deform plastic, particularly when it is old or already weakened.
Before soaking the entire blade assembly, test the mixture on a small hidden section. Wipe the test area clean and check for changes in color, texture, gloss, or surface finish.
If you notice any adverse reaction, stop and rinse the test area thoroughly.
Once you have confirmed that the cleaning solution is suitable, place the removable blades in the basin so that the dirty surfaces are exposed to the mixture.
The purpose of the soak is to loosen grime and soften residue, not to expose the plastic to increasingly strong chemicals.
7. Let the Blades Soak Instead of Scrubbing Immediately
This is the part that makes the method feel almost effortless.
Rather than immediately rubbing every blade with a sponge, allow the cleaning solution time to work.
For ordinary dust and grease, begin with approximately 15 to 30 minutes, provided the product instructions and the fan manufacturer’s guidance permit it.
Check the blades periodically. If the surface looks cleaner and the grime begins to lift, remove the blades and wipe them gently with a microfiber cloth.
If residue remains, a little more soaking time may help, but do not leave the blades submerged for hours without checking them. Extended exposure to cleaning chemicals can affect certain plastics.
There is no universal soaking time for every fan. The amount of dirt, the type of plastic, and the cleaning product all influence the result.
You should also avoid assuming that yellowing will disappear simply because the blades remain in the solution longer.
If the discoloration comes from changes within the plastic rather than a removable surface film, additional soaking may accomplish very little.
The goal is to remove the dirt safely without damaging the material.
8. Wipe Away the Remaining Dirt With Minimal Effort
After soaking, place the blades on a clean towel.
Use a soft microfiber cloth to wipe the surfaces gently. In many cases, loosened dust and greasy residue will come away without aggressive scrubbing.
Pay particular attention to the edges and the area around the center hub, where dust can accumulate.
For narrow spaces, use a soft toothbrush with light pressure. Avoid sharp tools that could scratch the plastic.
If a stubborn patch remains, repeat the gentle cleaning process rather than immediately reaching for an abrasive pad.
Steel wool, rough scouring pads, and abrasive cleaning sponges can leave glossy plastic scratched or cloudy. Even when the dirt disappears, those scratches may make the surface look worse.
Baking soda is sometimes suggested for stubborn stains, but it can be abrasive. If you decide to try it, first check the manufacturer’s guidance and test a small, hidden area. Do not rub hard, and discontinue use if the finish becomes dull.
After cleaning, examine the blades under good lighting. You should be able to distinguish remaining dirt from discoloration that is part of the plastic itself.
9. Should You Put the Blades in the Sun?
Some traditional cleaning methods recommend placing soaking plastic near a sunny window to help brighten it.
However, direct sunlight is not necessary for this cleaning routine, and it is not a guaranteed way to restore yellowed plastic.
Ultraviolet light can contribute to plastic aging and discoloration. Strong sunlight and excessive heat may also cause problems for older or delicate components.
For that reason, it is better to clean the blades at a comfortable indoor temperature and follow the instructions on the cleaning product.
Do not leave hydrogen peroxide mixtures sitting in direct sunlight unless the product’s directions specifically support that use.
Avoid placing the blades on a hot patio or in an area where the plastic may become excessively warm. Never use a heat gun or another intense heat source to speed up the process.
A careful soak, gentle wipe, and thorough rinse are generally more useful than trying to force a whitening effect with heat or sunlight.
10. Clean the Fan Grille While the Blades Are Soaking
If the blades are soaking safely, you can use the time to clean the other removable components.
The front and rear grilles often collect a surprising amount of dust. Their narrow openings can trap lint, pet hair, and greasy particles, particularly when the fan is used in a kitchen or busy living area.
Begin by removing loose dust with a soft brush or vacuum attachment.
Then wipe the grille with a cloth lightly dampened with warm water and a little dish soap, provided the material is compatible with this method.
Use a soft toothbrush to reach corners and narrow sections.
Rinse or wipe away any soap residue without soaking electrical components. Dry the grille thoroughly before reassembly.
For the motor housing, use only the cleaning method recommended by the manufacturer. In many cases, a dry cloth or a barely damp cloth is appropriate, but liquid should never enter the vents or electrical openings.
If dust is packed deeply inside the motor housing, consult the manual rather than pouring water or cleaning solution into the appliance.
Removing visible dust from the grille and accessible surfaces can make the entire fan look much cleaner.
11. Rinse and Dry Every Component Thoroughly
Once the blades are clean, rinse them with cool or lukewarm water if the material and cleaning product instructions permit rinsing.
Make sure that no slippery soap residue remains.
Use a clean towel to remove excess water, then allow the blades to air-dry completely on a clean, stable surface.
Pay particular attention to the central hub and any grooves where moisture might collect.
Do not reassemble the fan while the blades are still wet. Trapped moisture can affect the appliance, and any water that reaches electrical components could create a hazard.
The grille and other washable parts should also be completely dry before they are put back in place.
There is no need to rush this stage. Allowing enough drying time is one of the simplest ways to avoid problems later.
12. Reassemble the Fan and Check Its Condition
When all components are completely dry, follow the manufacturer’s instructions to put the fan back together.
Position the blade assembly correctly and secure the central fastener without overtightening it. Excessive force can damage plastic fittings.
Reinstall the grille and make sure all required screws and locking clips are secure.
Before plugging the fan in, gently rotate the blades by hand, if the design allows, to check that they move freely and do not rub against the grille.
Place the fan on a stable surface and keep the surrounding area clear.
When everything is assembled correctly, plug it in and test it on the lowest speed first.
Listen for unusual rattling or vibration and watch for wobbling. If the fan runs unevenly, switch it off and unplug it immediately. Check the assembly according to the manual, and do not continue using the fan if the problem persists.
Cleaning can improve the appearance of a fan and remove accumulated dust, but it cannot repair a cracked blade, damaged motor, or faulty electrical connection.
13. What This Cleaning Trick Can—and Cannot—Fix
It is important to have realistic expectations.
This method can be useful for removing surface dirt, greasy residue, and some of the grime that makes plastic blades look yellow or dull.
If the discoloration is mainly caused by accumulated residue, you may notice a considerable improvement after one careful cleaning session.
However, not all yellowing is caused by dirt.
Some plastics change color as they age or undergo prolonged exposure to sunlight, heat, and oxygen. In these cases, the discoloration may remain even after the surface is thoroughly cleaned.
Hydrogen peroxide is not a universal plastic-restoration solution. Depending on the material, concentration, and exposure time, it may have little effect or may damage the surface.
A blade that remains yellow after cleaning is not necessarily dirty. Repeatedly increasing the strength of the solution or extending the soaking time may create more problems than it solves.
The condition of the plastic matters just as much as its color.
If a blade is brittle, cracked, warped, or flaking, replace the damaged component if a suitable manufacturer-approved replacement is available. Otherwise, replacing the fan may be the safer option.
14. How to Keep Fan Blades Cleaner Throughout Summer
Once the fan is clean, a simple maintenance routine can help prevent heavy buildup from returning.
Wipe the grille regularly. During periods of frequent use, inspect the grille every week or two and remove loose dust before it accumulates.
Clean accessible blades periodically. Unplug the fan first and follow the manufacturer’s instructions. Use a soft cloth or brush to remove dust from accessible surfaces.
Pay attention to kitchen fans. Grease can travel farther through the air than many people realize. Fans near cooking areas may need more frequent cleaning than those in bedrooms or living rooms.
Keep fans away from excessive grease and smoke. If possible, position them away from cooking splashes and other sources of airborne residue.
Clean before storing. At the end of the warm season, remove accumulated dust and allow the fan to dry thoroughly before putting it away.
Use a breathable protective cover. A clean pillowcase or a suitable storage cover can help keep dust off a dry fan while it is not in use. Follow the manufacturer’s storage recommendations and never operate a covered fan.
Store the appliance in a dry place. Excessive moisture, dust, and temperature extremes can affect both plastic components and electrical equipment.
These small habits can make the next seasonal cleaning much easier.
15. Common Mistakes to Avoid When Cleaning Plastic Fan Blades
Even a simple cleaning project can go wrong if the wrong products or techniques are used.
Here are some common mistakes to avoid.
Using very hot water: Hot water can deform plastic. Use comfortably warm water instead.
Mixing cleaning chemicals: Combining hydrogen peroxide with vinegar, chlorine bleach, ammonia, or other cleaners can cause dangerous reactions. Use only one suitable cleaning product at a time.
Soaking electrical components: Never immerse the motor housing, switches, wiring, or assembled fan in a cleaning bath.
Scrubbing too aggressively: Rough pads and excessive pressure can scratch the plastic and damage its finish.
Leaving blades submerged indefinitely: Longer soaking does not necessarily mean better cleaning. Check the material and product instructions and remove the blades once the residue has loosened.
Ignoring cracks and warping: Cleaning does not make damaged plastic safe. Inspect each blade carefully before reassembly.
Reassembling while wet: Allow every component to dry fully before putting the fan back together.
Forgetting to test the fan: Always check for unusual vibration, wobbling, or rubbing after reassembly. Unplug the appliance immediately if something seems wrong.
Avoiding these mistakes helps make the cleaning process more effective while reducing the risk of damaging the appliance.
16. A Simple Way to Prepare Your Fan Before the Next Heat Wave
The best time to clean a fan is before you urgently need it.
When temperatures rise suddenly, stores can become busy, and household fans may be used for hours at a time. Discovering a dusty, yellowed appliance during the first hot afternoon is not ideal.
Preparing ahead allows you to inspect the fan, clean its accessible components, and confirm that it works properly before the weather becomes uncomfortable.
Choose a day when you have enough time to let everything dry completely. Gather your supplies, read the instruction manual, and work at a comfortable pace.
If the blades are removable and suitable for the cleaning method, allow the cleaning solution to loosen the grime before wiping them gently. While they soak, clean the grille and exterior according to the manufacturer’s instructions.
Afterward, rinse and dry the components, reassemble the fan carefully, and test it on its lowest setting.
The entire process can be straightforward, particularly when the fan is only dusty rather than heavily soiled.
Most importantly, remember that the goal is not necessarily to make old plastic look brand-new. It is to remove accumulated dirt, maintain the appliance, and identify any damage that could affect safe operation.
Conclusion
My grandmother’s fan-cleaning trick is a reminder that some household jobs become much easier when you let the right process do the work. Instead of spending ages scrubbing every yellowed blade, you can begin with a suitable cleaning solution, allow it time to loosen ordinary grime, and finish with a gentle wipe.
Warm water and dish soap are useful for everyday dust and greasy residue. For compatible removable plastic blades, 3% hydrogen peroxide may help improve certain stains, but it should only be used when the manufacturer’s guidance permits it. Always test a small area first, avoid mixing cleaning chemicals, and never soak electrical parts.
It is also important to understand the limits of the method. Surface grime may disappear with a careful cleaning, while discoloration caused by aging or prolonged sun exposure may remain. Cracked, brittle, or warped blades should never be treated as though a cleaning solution can restore their safety.
Once the blades and grille are clean, rinse and dry every washable component thoroughly. Reassemble the fan according to the instructions, then check for wobbling, unusual sounds, or other signs of trouble before using it.
A little seasonal maintenance can make a fan look fresher and help you identify problems before the hottest days arrive. By cleaning your fan before you need it, you can avoid a last-minute scramble and make the most of an appliance you already own.
Sometimes, the simplest household habits really are the most useful. A gentle soak, a soft cloth, and a little preparation can save time, reduce unnecessary scrubbing, and help keep your fan ready for the warm weather ahead.