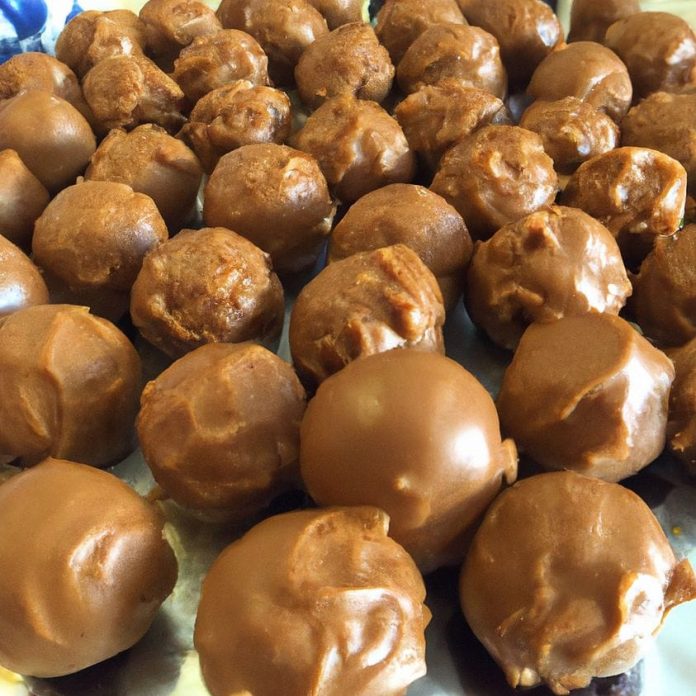
Indulge your sweet tooth with our delectable creation – “Butterfinger Balls.” These bite-sized treats are an exquisite blend of creamy peanut butter and the iconic Butterfinger candy, coated in rich, velvety chocolate. Whether you’re satisfying a craving or impressing guests, this recipe offers a delightful solution that’s quick and easy to prepare, taking just 30 minutes from start to finish.
Ingredients:
- 1⅓ cups creamy peanut butter
- ½ cup softened salted butter
- 1 teaspoon vanilla extract
- 2 cups powdered sugar
- 1½ cups Butterfinger Bits, plus extra for optional topping
- 3 cups chocolate melting wafers
Instructions:
Step 1: Preparing the Butterfinger Filling
In a spacious bowl or using a stand mixer, combine creamy peanut butter, softened salted butter, and vanilla extract. Cream these ingredients together for about 30 seconds.
Sift the powdered sugar into the mixture and continue beating until a smooth, uniform consistency is achieved.
Now, gently fold in the Butterfinger Bits until they are evenly distributed throughout the mixture.
Step 2: Chilling the Mixture
Place the mixture in the refrigerator, allowing it to chill for 30 minutes. This helps it firm up for easier shaping.
Step 3: Shaping the Balls
Line a cookie sheet with parchment paper. Using a medium-sized cookie scoop, portion out the peanut butter mixture and roll it into delightful balls. Arrange these on the parchment-lined cookie sheet.
Place the sheet in the freezer for approximately 20 to 30 minutes, allowing the balls to firm up.
Step 4: Dipping in Chocolate
Just before removing the balls from the freezer, melt the chocolate melting wafers in a wide glass using 30-second intervals in the microwave, stirring between each interval. Continue until the chocolate is fully melted and smooth.
Using a fork or dipping tool, immerse each peanut butter ball into the melted chocolate, ensuring they are generously coated. Place them back on the parchment paper.
Step 5: Adding the Finishing Touch
While the chocolate is still slightly soft, sprinkle additional Butterfinger Bits on top of the balls. Let them sit until the chocolate hardens, creating a delightful contrast of textures.
Conclusion:
In summary, the Butterfinger Balls represent the pinnacle of indulgence, embodying a harmonious fusion of rich peanut butter, the distinct crunch of Butterfinger, and the luxurious embrace of chocolate. These delectable treats offer a symphony of flavors and textures that tantalize the taste buds and leave a lasting impression of satisfaction.
Despite their decadent appeal, creating these culinary delights is surprisingly simple, requiring only five readily available ingredients and a straightforward process. This accessibility means that you can effortlessly whip up a batch of Butterfinger Balls whenever the craving strikes, without the need for extensive preparation or complex techniques.
Once crafted, these delightful morsels can be stored with ease. Simply place them in an airtight container and refrigerate them for up to seven days, ensuring that they retain their freshness and flavor. Alternatively, for those moments when an unexpected urge for something sweet arises, the Butterfinger Balls can be stored in the freezer, ready to be enjoyed at a moment’s notice.
Beyond their practicality, these treats serve as a versatile addition to any occasion. Whether showcased at a gathering or savored as a personal indulgence, the Butterfinger Balls never fail to captivate and delight. Their ability to elevate any moment with their irresistible allure makes them a beloved favorite among both hosts and guests alike.
In essence, the Butterfinger Balls transcend the realm of mere confectionery, emerging as a symbol of indulgence and delight. With their irresistible combination of flavors, simplicity of preparation, and versatility in serving, they stand as a testament to the joy that can be found in the art of culinary creation. So go ahead, treat yourself to a taste of bliss with these delectable Butterfinger Balls, and let each bite transport you to a realm of pure culinary delight.
Note:
- For optimum results, we recommend using Jif creamy peanut butter.
- If chocolate melting wafers are unavailable, chocolate chips can be substituted. Add ½ teaspoon of coconut oil for every cup of chocolate chips for a smoother texture.
- Be mindful not to let the balls sit out for too long before dipping, as they can become sticky, making it challenging for the chocolate to adhere.
- Avoid freezing the balls for more than 30 minutes before dipping, and place them in the refrigerator if you’re not ready to dip them yet.
SOURCE OF THE PICTURE : all we cook


