
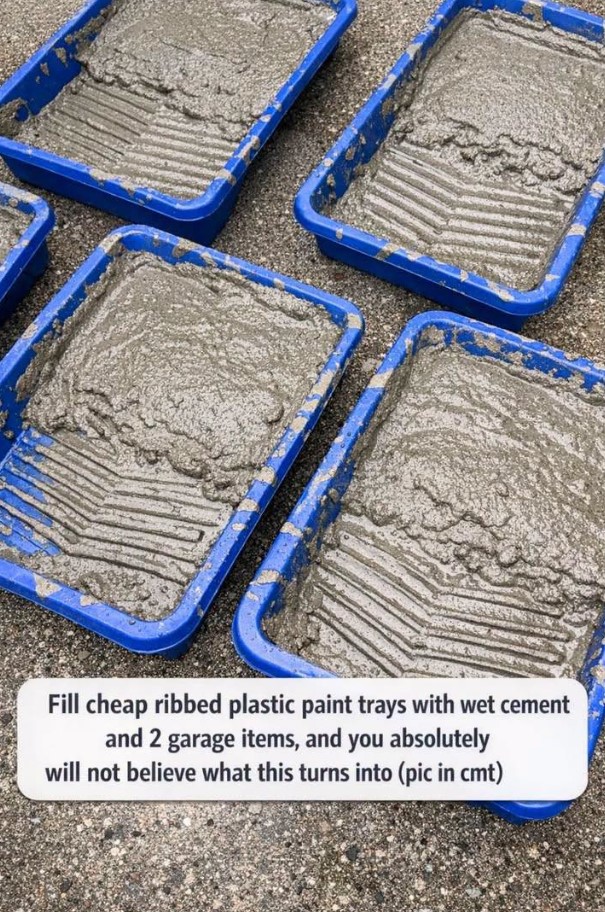
Sometimes the most useful DIY projects begin with things that seem completely unrelated. A cheap plastic paint tray, a little leftover cement, and a couple of ordinary items sitting around the garage may not look like the beginning of anything special. But with the right approach, these inexpensive materials can be transformed into attractive, textured concrete pieces that look far more intentional than their humble beginnings suggest.
The clever part of this project is the ribbed shape of the plastic paint tray. Instead of treating those ridges as a nuisance, you can use them as part of the design. Once the concrete hardens and the tray is removed, the textured surface creates a distinctive pattern that can be used for garden stepping stones, small pavers, decorative outdoor pieces, or other practical projects around the home.
It is also a great way to make use of leftover concrete and materials rather than buying expensive premade products. With a little patience and careful preparation, you can create several matching pieces for a fraction of the cost.
Why Use a Plastic Paint Tray as a Mold?
Plastic paint trays make surprisingly useful molds because many of them are inexpensive, sturdy, and have smooth interior surfaces that allow cured concrete to be released relatively easily.
The ridged portion of the tray is especially interesting. When concrete is poured into the tray, the wet mixture fills around the raised sections. After the concrete cures, those ridges become part of the finished design.
The result isn’t simply a plain block of concrete. Instead, you get a piece with texture and visual interest built directly into its surface.
Another advantage is that the trays are generally available in several sizes, so you can experiment with different shapes and dimensions. If you are making several pieces, using identical trays also helps create a coordinated look.
What You Will Need
The exact materials can vary depending on what you want to make, but the basic project can be built around a few inexpensive supplies.
Basic Materials
- Cheap ribbed plastic paint trays
- Premixed concrete or cement suitable for small molds
- Two sturdy garage items that can be used as supports, spacers, handles, or reinforcement depending on the design
- Water, if required by the concrete mix
- Disposable mixing container
- Mixing tool
- Work gloves
- Eye protection
- Cooking oil or commercial mold-release product
- Trowel or putty knife
- Flat work surface
If you are working with concrete regularly, having a small bucket, mixing paddle, and a few reusable molds can make future projects much easier.
Step 1: Prepare Your Work Area
Before mixing anything, choose a level surface where the trays can remain completely undisturbed while the concrete cures.
This is important because wet concrete is heavy. Once it has been poured into a flexible plastic tray, moving the tray can cause the mixture to shift, spill, or settle unevenly.
Cover the work surface with cardboard, plastic sheeting, or another protective material. Concrete can be messy, and dried splashes are much easier to prevent than remove.
Put on gloves and eye protection before beginning. Cement-based products can irritate skin and eyes, so basic protection is worth taking seriously.
Step 2: Prepare the Paint Trays
Clean the trays thoroughly and make sure they are free from dried paint, dust, grease, or other debris.
Once clean and dry, apply a very thin layer of mold-release agent to the inside of the tray. A light coating can make removing the cured concrete considerably easier.
Don’t flood the tray with oil. Too much release agent can affect the surface of the concrete and may leave unwanted marks.
Pay particular attention to the corners and textured areas. These are the places where concrete can become firmly lodged if the mold isn’t prepared properly.
Step 3: Prepare the Concrete
Mix your concrete according to the instructions on the product you’re using.
The goal is to achieve a consistency that is wet enough to flow into the details of the mold but not so watery that the mixture separates. Concrete that is too dry may leave gaps, while an excessively wet mixture can weaken the finished piece.
Add water gradually rather than all at once. Mix thoroughly between additions until the consistency looks uniform.
If you’re making several trays at once, try to keep the batches as consistent as possible. Differences in water content can produce noticeably different textures and strengths.
Step 4: Fill the Ribbed Trays
Carefully spoon or pour the wet concrete into each tray.
Start by filling the lowest and most detailed sections of the tray. Work slowly so the concrete reaches all of the grooves and corners.
As the tray fills, gently tap or vibrate the sides. This helps trapped air bubbles rise to the surface and encourages the concrete to settle into the ribbed pattern.
Don’t shake the tray aggressively. The goal is simply to help the mixture settle.
Use a trowel or flat tool to smooth the top surface. Depending on how you plan to use the finished piece, you may want the back to be as flat and level as possible.
Step 5: Add the Two Garage Items
This is where the project can become particularly interesting.
The two ordinary garage items mentioned in the idea can be incorporated into the wet concrete to give the finished pieces additional function or structure. Depending on the exact design, they may serve as reinforcement, supports, attachment points, or handles.
The important thing is to make sure anything embedded into concrete is strong enough for the intended purpose and positioned consistently.
If you’re making stepping stones or decorative garden pieces, avoid creating sharp protrusions or exposed metal that could become a hazard later.
For anything expected to carry significant weight, don’t assume that a homemade concrete piece is structurally adequate simply because it has hardened. Use appropriate reinforcement and follow established construction practices.
Step 6: Remove Air Pockets
After filling the trays, gently tap around the sides again.
You may notice tiny bubbles appearing on the surface. That’s normal. The more evenly the concrete settles, the cleaner the finished texture is likely to be.
A smooth finish isn’t always necessary, especially for an outdoor project. In fact, a slightly rustic surface can make homemade concrete pieces look more natural.
The most important thing is making sure there aren’t large voids inside the concrete.
Step 7: Let the Concrete Cure
This is the step where patience matters most.
Don’t rush to remove the concrete from the trays simply because the surface feels hard. Concrete continues gaining strength as it cures.
Place the filled trays somewhere protected from excessive heat, freezing temperatures, rain, pets, and accidental bumps.
Follow the curing recommendations for the specific concrete product you’re using. The exact time can vary considerably depending on the mix, temperature, humidity, thickness, and other conditions.
If the concrete dries too quickly, it may develop cracks or a weaker surface. A controlled curing process generally produces better results.
Step 8: Carefully Release the Finished Pieces
Once the concrete has cured sufficiently, gently flex the plastic tray.
Because the tray is flexible, you can often loosen the edges without damaging the concrete.
Don’t immediately pry aggressively at one corner. Work gradually around the edges until you feel the piece begin to release.
Turn the tray over onto a protected surface and allow gravity to help with the process.
If a piece refuses to come out, don’t force it. A little additional patience is usually better than breaking the concrete or damaging the mold.
The Ribbed Texture Is the Secret
One of the best things about this project is that you don’t need complicated carving or decorative tools to create an interesting surface.
The mold does the work for you.
The raised pattern inside the paint tray becomes a repeating texture in the concrete. Depending on how the finished piece is positioned, the ridges can create shadows that make an otherwise simple gray surface much more visually appealing.
You can also experiment with different finishes.
For example, some DIYers may prefer the natural gray appearance of concrete, while others might stain or paint the cured pieces after they have completely dried.
For outdoor applications, choose products specifically designed for concrete and exterior use.
Where Can You Use the Finished Pieces?
There are many possibilities.
These homemade concrete pieces can potentially be used as garden stepping stones, small patio accents, plant stands, decorative borders, outdoor organizers, or other non-structural landscaping elements.
If you’re creating stepping stones, place them carefully and make sure they sit securely on a properly prepared surface. They shouldn’t wobble when stepped on.
You can also make several pieces and arrange them together to create a coordinated pathway.
Another advantage is customization. Rather than having every garden feature look identical to something purchased at a home-improvement store, you can create pieces with a handmade appearance.
Ways to Customize the Project
Once you’ve mastered the basic technique, there are plenty of ways to experiment.
You could add decorative stones, colored concrete pigments, small pieces of tile, or other suitable materials to the surface before the concrete cures.
Another option is to create different sizes and arrange them together.
If you want a more modern appearance, keeping the finished pieces simple and uniform can produce a clean look. For a rustic garden, slight variations between pieces can make the project feel more natural.
You can also experiment with different plastic trays. The shape and texture of the mold will ultimately determine much of the appearance of the finished concrete.
A Few Important Safety Considerations
Concrete projects are simple, but they shouldn’t be treated as completely harmless.
Always wear gloves when handling cement or concrete mixes. Cement can be irritating to the skin, particularly when it remains wet for an extended period.
Eye protection is also a good idea when mixing or handling dry cement.
Work in a well-ventilated area and avoid breathing dust from dry cement products. Follow the safety instructions printed on the specific product you’re using.
Most importantly, don’t use a homemade concrete piece for a structural application unless its design has been properly engineered for that purpose.
Why This DIY Idea Is So Appealing
What makes this project stand out isn’t just the finished product. It’s the idea behind it.
A plastic paint tray is normally something you’d use for a few hours while painting a wall before tossing it aside or storing it in the garage. Concrete is usually associated with construction, foundations, sidewalks, and heavy-duty projects.
Putting those two ordinary things together creates something completely different.
The ridged tray becomes a reusable mold, while leftover concrete becomes a useful finished object. Instead of spending a considerable amount of money on decorative outdoor pieces, you can experiment with materials you may already have available.
And because the project can be repeated, one successful attempt can turn into an entire collection of matching pieces.
Conclusion :
This paint-tray concrete project is a perfect example of how creative DIY thinking can turn inexpensive, ordinary materials into something surprisingly useful. A cheap ribbed plastic tray may not look like much when sitting on a garage shelf, but its shape can become the foundation for textured concrete pieces with plenty of character.
The real appeal is the combination of simplicity and versatility. You don’t need an expensive mold or a complicated workshop setup to get started. With concrete, a few basic tools, suitable garage items, and a little patience, you can create pieces that can add interest to a garden, walkway, patio, or other outdoor space.
The key is to take your time with preparation, mix the concrete properly, make sure the material settles completely into the mold, and allow it enough time to cure before attempting to remove it. Those small details can make the difference between a cracked, disappointing result and a sturdy piece you’ll actually want to use.
It is also a great reminder that DIY doesn’t always mean buying more supplies. Sometimes the best projects begin by looking at familiar objects differently. That inexpensive paint tray sitting in the garage may have a second life as a mold, and those overlooked garage items may have a useful role in the finished design.
Once you see what the first batch looks like, you may find yourself looking around the garage and wondering what else could be turned into a mold. That’s often where the most creative homemade projects begin.