
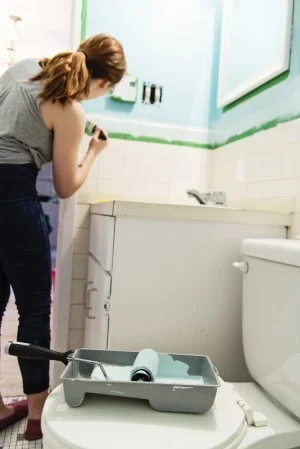
Repainting a bathroom can be a daunting task, especially when it comes to the challenging space behind the toilet. This area, often neglected, poses a unique challenge for homeowners and renters alike. However, with the right techniques and tools, achieving professional-looking results is within reach. In this guide, we explore two effective options for painting behind a toilet without the need to move the bulky ceramic fixture.

Option 1: Cover and Paint – A Comprehensive Approach:
When repainting the entire bathroom or the wall where the toilet is located, a comprehensive approach ensures a mess-free and flawless paint job.
Step 1: Ensure Proper Ventilation Bathrooms can be small and poorly ventilated. Enhance ventilation by removing moisture-retaining items like shower curtains and towels. Open windows or use a circulating fan. Consider wearing a painter’s mask to avoid inhaling paint fumes.
Step 2: Dust and Prep the Area Clean the area behind the toilet with a mild cleanser to remove dust and hair build-up. Cover the floor with a plastic sheet secured with painter’s tape to prevent paint spills. Wrap the toilet with an extra-large plastic garbage bag, securing it in place with painter’s tape.
Step 3: Prime and Paint Apply one to two coats of primer for optimal adhesion. Use a narrow paint roller to reach around the toilet, a 3”-wide foam brush for the space behind the toilet, and a 1”-wide angled brush for detail work around pipes. Allow the primer to dry thoroughly before applying paint.
Option 2: The Innovative Jimmy Sponge Stix:
For a specialized and efficient solution, the Jimmy Sponge Stix proves to be a valuable tool for painting the narrow space behind a toilet.

Step 1: Ventilate and Prep for Paint Establish good ventilation and ensure a clean surface for adhesion. Use the Jimmy Sponge Stix to clean the wall behind the toilet with soapy water. Let it air dry while cleaning the tool itself.
Step 2: Roll Primer and Paint with the Jimmy Sponge Stix Apply paint primer to the spongey side of the Jimmy Sponge Stix using a traditional paint roller. Glide the stick down the wall behind the toilet, ensuring complete coverage. Apply two coats of primer, allowing sufficient drying time. Clean the stick and repeat the process with two coats of paint.
Conclusion
Repainting behind a toilet may seem challenging, but with the right techniques and tools, it becomes a manageable task. Whether opting for the comprehensive cover-and-paint method or the innovative Jimmy Sponge Stix, achieving a professional finish in this hard-to-reach space is both feasible and rewarding. Selecting the right paint and primer ensures longevity and protection against moisture, allowing you to enjoy the refreshed look of your bathroom for years to come.
images source : amazon – istock photo


