
Caulking removal is not complicated, but it is a tedious task. However, with the right tools and a little planning, you can minimize the hassle and get the job done quickly.
Caulk usually lasts for years, but not forever. If the caulk becomes discolored, cracked, or begins to separate, it is time to replace it with new. However, before laying a new bead, the caulking that is already there must be removed. Removing the caulking is not that difficult, but the process is tedious. In any case, it is always a good idea to know what type of sealant you are using. So before you do anything else, check to see if the caulking is silicone-based or water-based. Silicone-based caulk is rubbery and has some expansion and contraction, while water-based caulk is much harder and tends to peel easily. Some caulking agents are effective for both types, while others are effective for only one or the other. Avoid going back and forth to the store and be aware of what you are buying.
Step 1.
Make sure the work area is well ventilated and always follow the safety precautions listed in the instructions for the caulking agent you are using. (Goo-Gone is a popular multi-purpose product that can be ordered from Amazon). When ready, apply the product to the caulking area to be removed and wait. The caulk remover will not magically erase the sealant; it will merely soften it. In most cases, the longer you let the chemical remover sit, the softer and more flexible the caulking will become. Wait at least 4 hours. Note that one bottle of typical caulking remover will usually cover about 20 to 30 feet of caulking.
Step 2.
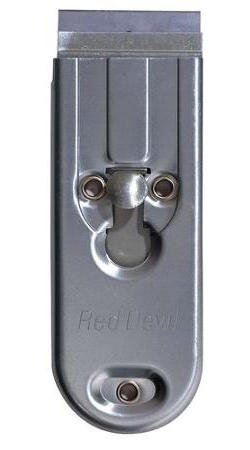
Once the caulk has softened, work with a caulk removal tool (check Amazon for examples) or a simple cutter knife. Be careful to use the latter, as it may scratch the material on either side of the caulk bead. If the remover works, the caulk should come off easily. Use a toothbrush or putty knife, especially if any remains in the gaps.
Step Three.
The last remnants of caulk can be very stubborn. If you find caulk that you just don’t want to give up, one option is to pour an alcohol-soaked rag over the remaining caulk and leave it in place for a few days. Want a more straightforward method? Use a heat gun or hair dryer. When using either method, be careful not to overheat adjacent materials (especially plastics that are sensitive to high temperatures). Any remaining caulking exposed to heat should eventually soften enough to be removed with a removal tool, razor, brush, or putty knife.
Step Four.
Clean the surface where the caulking was originally located to complete the process. Mold and soap scum may have accumulated here. Mold can be treated by soaking a cotton cloth with bleach diluted with water. For soap scum, use the same method, but instead of using bleach, opt for a homemade shower cleaner (usually a mixture of vinegar and water works well).
With the right materials, the right amount of expertise, and a little luck, the task of removing caulking can be painless. Home remodeling, like life, is a process in which patience is a virtue. Take your time.


