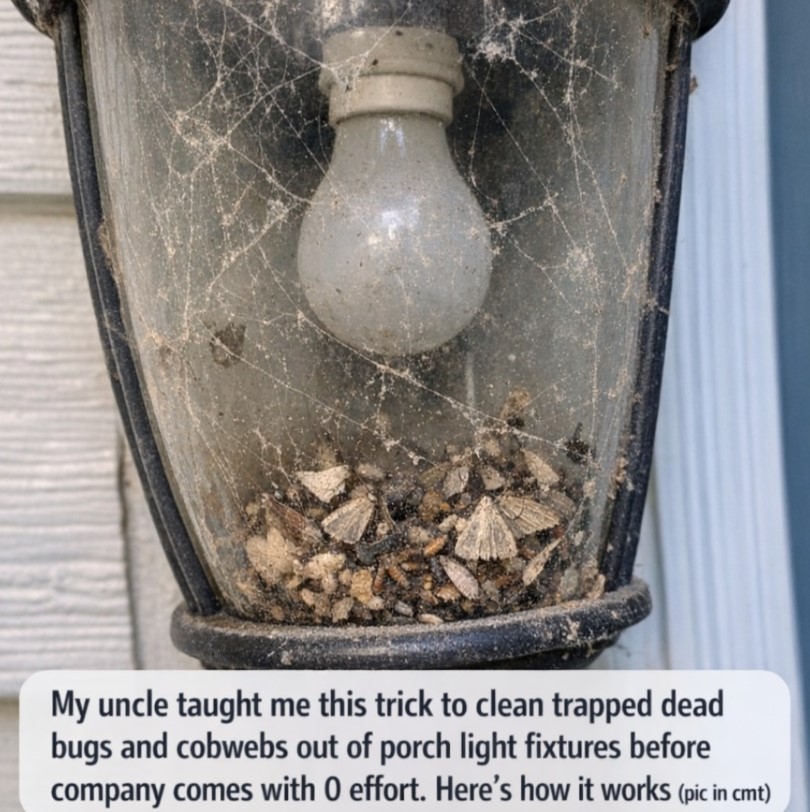
Have you ever looked at your porch light just before guests arrive and suddenly noticed dead insects, dusty cobwebs, and tiny bits of debris trapped behind the glass? It is one of those small details that can make an otherwise clean entrance look neglected. The frustrating part is that outdoor light fixtures seem to collect bugs throughout the warmer months, and cleaning them can feel like an unnecessary chore when you are already busy preparing for company.
Fortunately, there is a simple trick that can make this task much easier. Instead of reaching inside with a paper towel and smearing insect debris across the glass, start by carefully opening the fixture and using a vacuum to remove the loose bugs and cobwebs. A soft brush and a microfiber cloth can take care of the remaining dust.
This method requires only a few common household supplies and can save time compared with taking apart the entire light fixture. The key is to work carefully, protect the glass, and make sure the light is completely safe to handle before you begin.
Why Porch Light Fixtures Collect Dead Bugs and Cobwebs
Outdoor lights attract flying insects because many insects respond to artificial light at night. Moths, gnats, beetles, and other small bugs may fly toward a porch light and become trapped inside the fixture.
Once insects enter the lantern, they can settle around the bottom, behind the glass panels, or near the bulb socket. Over time, their remains mix with dust, pollen, and other outdoor debris.
Spiders may also build webs around the fixture because insects provide a convenient food source. Webs often appear around the top of the light, underneath the decorative cap, and where the fixture meets the wall.
Rain, humidity, and temperature changes can make the problem worse. Dust may stick to damp glass, while old insect remains can leave marks that are difficult to remove with a quick wipe.
That is why a porch light that looked perfectly fine a few weeks ago can suddenly appear dirty when you switch it on in the evening.
The good news is that most routine buildup can be removed without using harsh chemicals or scrubbing the glass aggressively.
The Simple Vacuum Trick That Makes Cleaning Easier
The main idea is to remove loose debris before wiping the glass.
Many people instinctively reach for a damp cloth as soon as they notice dead bugs inside a fixture. However, this can push insect remains into corners, smear dust across the glass, and make the cleaning process messier.
A vacuum with a narrow crevice attachment or a soft brush attachment can remove much of the loose material first. A small paintbrush can help dislodge stubborn cobwebs, while a microfiber cloth can remove the thin layer of dust that remains.
You do not need an expensive cleaning product or a specialized outdoor-light cleaning kit. A few basic tools are usually enough.
What You Need
Gather these supplies before starting:
- A handheld vacuum or a household vacuum with a crevice attachment.
- A clean, soft paintbrush or soft detailing brush.
- One or two microfiber cloths.
- Warm water.
- A small amount of mild dish soap, if needed.
- A small bowl or tray for screws and decorative fasteners.
- A stable step stool, if the fixture is slightly above comfortable reach.
Avoid using stiff brushes, abrasive pads, or tools that could scratch the glass or damage the fixture’s finish.
If the light is mounted too high to reach safely from the ground or a stable step stool, do not stretch or balance on furniture. Arrange for someone with the appropriate equipment to clean it safely.
Step 1: Turn Off the Light and Let It Cool
Before touching the fixture, switch the porch light off and allow it to cool completely. Depending on the bulb and fixture, this may take 15 to 20 minutes or longer.
Even when a light has been switched off, the bulb and nearby metal parts can remain hot enough to cause discomfort or burns.
For additional safety, switch off the appropriate circuit breaker before opening the fixture, especially if you will be working near the bulb socket or electrical components. Make sure the power cannot be accidentally switched back on while you are cleaning.
Never handle wiring, sockets, or electrical connections with wet hands or while standing on a wet surface.
If the fixture has damaged wiring, loose electrical parts, signs of water intrusion, or corrosion around the socket, stop and contact a qualified electrician rather than attempting an ordinary cleaning.
Step 2: Gather Your Tools Before Opening the Fixture
Having everything ready makes the process quicker and reduces the amount of time the fixture remains open.
Place the microfiber cloths, soft brush, vacuum attachment, and small tray nearby. The tray is especially useful for holding small screws, nuts, and decorative finials so they do not roll away or disappear between porch boards.
If you need a step stool, position it on a level, stable surface before climbing.
Take a moment to examine the light fixture. Look for the screws, clips, or other fasteners that hold the glass panels in place. Some fixtures have a hinged panel, while others have a removable bottom cover.
The exact design varies, so follow the manufacturer’s instructions whenever possible.
Step 3: Open Only the Part You Need to Clean
You usually do not need to dismantle the entire porch light just to remove a few dead insects.
Many lantern-style fixtures have small screws, cap nuts, or decorative fasteners that hold the glass in position. If the manufacturer’s instructions allow it, loosen the appropriate fasteners enough to open the panel or remove the cover.
Keep one hand supporting the glass whenever possible. Glass panels can slip unexpectedly, particularly on older fixtures with worn or corroded hardware.
Do not force a screw that is stuck, and do not continue if the glass appears loose, cracked, or difficult to support safely. A small cleaning job is not worth risking broken glass or a fall.
Once the opening is accessible, you can begin removing the debris.
Step 4: Vacuum the Dead Bugs and Cobwebs First
This is the most important part of the trick.
Instead of immediately wiping the inside of the fixture, use the vacuum to collect loose insects, dried wings, dust, and cobwebs.
Fit the vacuum with a narrow crevice attachment or a suitable soft brush attachment. Use gentle suction and move slowly around the bottom of the lantern, the inner corners, and the areas where webs have gathered.
Pay attention to the space behind the glass panels and around the base of the fixture. These areas can collect a surprising amount of debris.
Keep the vacuum attachment away from wiring, the bulb socket, and other delicate electrical components. Do not press the nozzle against the socket or use the vacuum in a way that could pull on wires or loosen parts.
If you are working around delicate decorative trim, reduce the suction where possible.
The advantage of vacuuming first is simple: you remove most of the loose mess before introducing a cloth. This helps prevent dried insects and cobwebs from spreading across the glass.
Step 5: Use a Soft Brush for Stubborn Cobwebs
Some cobwebs cling to narrow corners or wrap around decorative metalwork. Others may remain attached near the top of the fixture.
For these areas, use a soft paintbrush or a clean detailing brush.
Gently guide the brush along the corners and edges while keeping the vacuum nozzle nearby to collect the debris. Work slowly rather than flicking the brush sharply, which can send dust and insect remains into the air.
Avoid brushing directly against wiring or fragile components. If debris is trapped in an area that cannot be reached safely, leave it for a qualified professional.
For most ordinary fixtures, this combination of vacuuming and gentle brushing removes the majority of loose cobwebs without requiring extensive scrubbing.
Step 6: Wipe the Inside of the Glass
After removing the loose debris, inspect the glass panels. You may notice a thin film of dust, small insect marks, or faint streaks left behind.
Dampen a microfiber cloth lightly with warm water. If the glass needs additional cleaning, use a small amount of mild dish soap diluted in water.
The cloth should be damp rather than dripping wet. Avoid spraying liquid directly into the fixture, especially near the socket, wiring, or other electrical components.
Wipe the accessible glass gently, paying attention to areas where insects have left marks. Then use a clean, dry microfiber cloth to remove remaining moisture and reduce streaks.
Frosted, textured, or specially finished glass may require more delicate treatment, so follow the fixture manufacturer’s cleaning recommendations.
Do not use abrasive pads or harsh chemicals unless the manufacturer specifically approves them. These products can damage finishes, discolor metal, or scratch glass.
Before reassembling the fixture, make sure the cleaned parts are completely dry.
Step 7: Clean the Bulb and the Outside of the Fixture
A clean glass cover can still look dull if the bulb and outer housing are covered in dust.
With the power switched off and the bulb completely cool, remove it only if the manufacturer’s instructions permit this and you can do so safely. Wipe the bulb gently with a dry microfiber cloth, following its cleaning instructions.
Do not immerse a bulb in water or allow moisture to enter its base. Replace a damaged bulb rather than trying to clean it.
Next, wipe the outside of the fixture. Pay attention to the top cap, bottom edge, decorative finial, wall-mounting plate, and the area where the light meets the siding or brick.
Cobwebs often collect underneath the top edge because these sheltered spaces are protected from wind and rain.
A final pass with a dry microfiber cloth can make the entire fixture look cleaner, rather than leaving the glass spotless while the outside remains dusty.
Step 8: Reassemble the Fixture Carefully
Once everything is clean and dry, return the glass panels or cover to their original positions.
Make sure every panel sits correctly before tightening the fasteners. If the fixture uses several screws, tighten them gradually and evenly rather than forcing one side down while the other remains loose.
Do not overtighten small screws or decorative nuts. Excessive pressure can crack glass, damage threads, or make future maintenance more difficult.
If a screw is badly corroded, a gasket is damaged, or the glass no longer fits securely, address the problem before using the light again.
Once the fixture is fully reassembled and all parts are secure, restore power and test the light.
The entire process may take only a few minutes for a simple fixture with light buildup. Older or more complicated lanterns may require more time, particularly if their glass panels need to be removed and washed individually.
How to Keep Bugs and Cobwebs From Returning So Quickly
Cleaning the fixture is helpful, but a few small changes may reduce how often you need to repeat the task.
Choose a Warmer Outdoor Light Bulb
Some insects are more attracted to certain light wavelengths than others. In many situations, warm-colored or amber outdoor bulbs attract fewer insects than cooler, bluish-white lighting.
The effect varies by insect species and the surrounding environment, so changing the bulb will not eliminate bugs completely.
Choose an outdoor-rated bulb that is compatible with your fixture and provides enough light for safe entry and visibility.
Use the Light Only When Necessary
If your porch light does not need to remain on throughout the night, consider switching it off when it is not needed.
A motion sensor or timer can help reduce the number of hours the light remains illuminated. This may also save energy, depending on your lighting setup.
However, make sure your entryway remains adequately lit when people need to use it.
Inspect the Fixture for Gaps or Damage
If insects repeatedly enter the fixture in large numbers, check for loose glass panels, missing gaskets, damaged covers, or gaps caused by deteriorating hardware.
Do not seal every opening indiscriminately. Outdoor light fixtures may require specific openings for drainage or ventilation, and blocking them can create other problems.
Follow the manufacturer’s guidance when replacing seals or repairing the housing. If the fixture is damaged or no longer fits together properly, repair or replacement may be the safest option.
Make Cleaning Part of Your Routine
During periods when insects are especially active, inspect your porch light every few weeks. A quick vacuum and wipe-down can prevent debris from accumulating until it becomes difficult to remove.
The ideal schedule depends on your climate, the number of insects around your home, and whether the light stays on overnight.
A brief routine inspection is often easier than waiting until the fixture is visibly full of dead bugs and dusty webs.
Common Mistakes to Avoid When Cleaning Porch Lights
Even a simple cleaning job can become unnecessarily difficult if you use the wrong method.
Wiping before vacuuming: A damp cloth can smear insect remains and dust across the glass. Remove loose debris first, then wipe the surface.
Cleaning while the bulb is hot: Always switch the light off and allow it to cool completely before handling the fixture.
Using too much water: Excess liquid can enter electrical areas and may leave streaks or moisture trapped inside the housing. Use a lightly damp cloth rather than spraying the fixture directly.
Forcing stuck fasteners: Corroded screws and decorative nuts can break or damage the glass if forced. Stop if the parts will not loosen safely.
Using harsh chemicals: Strong cleaners and abrasive tools may damage glass finishes, painted metal, or decorative coatings. Mild cleaning solutions are generally sufficient for routine dirt.
Reaching too far: Never stretch from a step stool or stand on an unstable chair to reach an overhead light. Use suitable equipment or arrange professional help.
Ignoring damaged wiring or corrosion: A fixture with electrical damage, water intrusion, or significant corrosion needs more than routine cleaning. Have it assessed by a qualified professional.
Frequently Asked Questions
How often should I clean my porch light fixtures?
During active insect seasons, checking your fixtures every two to four weeks is a reasonable starting point. If your lights attract many bugs or remain on throughout the night, you may need to clean them more often.
Can I use a vacuum to remove dead bugs from a porch light?
Yes, a vacuum can be useful for removing loose dead insects and cobwebs from an accessible fixture. Turn off the power, let the light cool, and use a suitable attachment with gentle suction. Keep the nozzle away from wiring and electrical components.
Do I need to remove the entire light fixture from the wall?
Usually not. Many fixtures allow you to open a glass panel or remove a cover for routine cleaning. Follow the manufacturer’s instructions, and do not attempt to dismantle electrical connections just to remove debris.
Is dish soap safe for cleaning the glass?
A small amount of mild dish soap diluted in warm water is often suitable for ordinary glass, provided the fixture manufacturer permits it. Apply it with a lightly damp cloth, avoid electrical components, and dry the glass thoroughly.
Will changing my porch light bulb stop insects from gathering?
It may reduce insect activity, particularly if you replace a cool-colored bulb with a warmer or amber option. However, no ordinary bulb guarantees that insects will stay away completely.
What if I find water inside the fixture?
Water inside a light fixture can indicate a damaged seal, incorrect installation, or another problem. Do not touch wet electrical components or simply switch the light back on. Keep the circuit off and have the fixture inspected by a qualified electrician before using it again.
Conclusion :
Cleaning dead bugs and cobwebs out of porch light fixtures does not have to become a long, frustrating chore. The simple method is to switch off the power, let the fixture cool, carefully open the accessible cover, and vacuum out loose debris before wiping the glass with a microfiber cloth.
A soft brush helps remove stubborn webs, while a small amount of mild soapy water can take care of marks that remain. Once everything is dry, reassemble the fixture carefully and check that all panels and fasteners are secure.
You can also make future cleanups easier by using suitable warm-colored outdoor lighting, switching the light off when it is not needed, and checking the fixture periodically for damage or gaps.
Most importantly, never sacrifice safety for a quick result. If the light is difficult to reach, the glass is unstable, or you notice damaged wiring or corrosion, stop and get professional assistance.
The next time company is coming and you notice dead bugs trapped behind your porch light, remember the simple principle: vacuum first, wipe second, and reassemble carefully. With a few basic supplies and the right precautions, you can make your entrance look fresher without turning a small cleaning task into a major project.