Some meals have a special way of making an ordinary day feel a little better. When the weather is cold, gray, or rainy, a warm homemade sandwich can be exactly what you need. It doesn’t have to be complicated or expensive to taste wonderful. Sometimes, the simplest recipes are the ones we remember most.
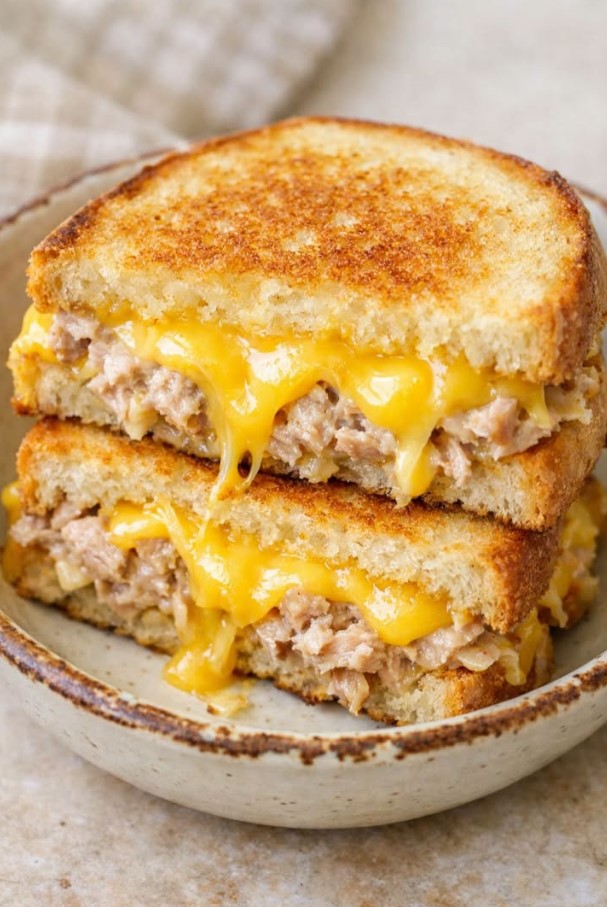
This 4-Ingredient Tuna Melt is a perfect example. Made with canned tuna, mayonnaise, sandwich bread, and slices of cheese, it transforms a handful of inexpensive ingredients into a warm, filling lunch. The outside becomes beautifully golden and crispy in the skillet, while the inside stays creamy, cheesy, and wonderfully gooey.
It’s the kind of old-fashioned comfort food that reminds many people of childhood lunches and simple family meals. You don’t need special equipment, complicated preparation, or a long shopping list. Just a few pantry staples and a skillet are enough to make something satisfying.
Whether you’re preparing a quick lunch for yourself or making sandwiches for the whole family, this easy tuna melt is worth keeping in your recipe collection.
Why You’ll Love This 4-Ingredient Tuna Melt
There are plenty of reasons to make this simple sandwich, especially when you want something comforting without spending too much time in the kitchen.
- Only four main ingredients: You probably already have most of them in your refrigerator or pantry.
- Budget-friendly: Canned tuna and basic sandwich ingredients make this an affordable meal.
- Quick preparation: The tuna filling takes only a few minutes to prepare, and the sandwiches cook quickly.
- Crispy outside: Toasting the bread in a skillet creates a golden, crunchy exterior.
- Creamy, cheesy center: The mayonnaise keeps the tuna moist, while the melted cheese brings everything together.
- Easy to customize: You can change the cheese or add a few extra ingredients when you want something different.
Ingredients You’ll Need
This recipe makes 2 generous sandwiches and requires just four ingredients.
- 1 can (5 ounces) tuna, drained well
- 1/4 cup mayonnaise
- 4 slices sandwich bread
- 4 slices yellow cheese (American cheese or mild cheddar)
A Few Notes About the Ingredients
Tuna: Canned tuna is the main ingredient in this recipe. Choose tuna packed in water or oil according to your preference. Make sure to drain it thoroughly before mixing it with the mayonnaise. Too much liquid can make the filling watery and cause the bread to become soggy.
Mayonnaise: Mayonnaise gives the tuna its creamy texture and helps hold the filling together. You can adjust the quantity slightly depending on how moist you like your tuna salad.
Sandwich bread: Regular white sandwich bread works particularly well because it becomes crisp on the outside while remaining soft enough to hold the filling. Whole-wheat bread is another good option.
Cheese: American cheese melts beautifully and creates a smooth, gooey center. Mild cheddar is an excellent alternative if you prefer a slightly stronger cheese flavor.
How to Make This Easy 4-Ingredient Tuna Melt
Step 1: Prepare the Tuna Filling
Open the can of tuna and drain it thoroughly. Transfer the tuna to a small mixing bowl.
Use a fork to break up any large pieces, making the texture relatively even. Add the mayonnaise and stir until everything is combined.
The mixture should look creamy but should still have some texture. If you prefer a softer filling, you can add a little more mayonnaise, although the original recipe uses 1/4 cup.
Step 2: Prepare the Bread
Place all four slices of sandwich bread on a clean countertop or cutting board.
Divide the tuna mixture between two slices. Spread it evenly, almost reaching the edges, so each bite contains a good amount of filling.
Try not to make the tuna layer excessively thick. A balanced amount makes the sandwiches easier to flip and helps the cheese melt evenly.
Step 3: Add the Cheese
Place two slices of yellow cheese over the tuna mixture on each sandwich.
You can slightly overlap the cheese slices to cover more of the filling. This creates a delicious melted layer that holds the tuna and bread together.
American cheese gives the sandwich a particularly smooth texture, while mild cheddar adds a little more flavor.
Step 4: Assemble the Sandwiches
Place the remaining two slices of bread over the cheese to complete the sandwiches.
Press gently with your hand or a spatula so the layers stay together.
At this point, your sandwiches are ready for the skillet. There is no need to add butter or oil for the original four-ingredient version.
Step 5: Cook the First Side
Place a large skillet over medium heat and allow it to warm up.
Put both sandwiches into the dry skillet. Cook for approximately 3 to 4 minutes, or until the bottom of the bread becomes golden brown and crisp.
You can gently press the sandwiches with a spatula to help the filling warm through and encourage the cheese to begin melting.
Keep an eye on the bread. If it starts browning too quickly, reduce the heat slightly.
Step 6: Flip and Melt the Cheese
Carefully turn each sandwich over using a spatula.
Cook the second side for another 3 to 4 minutes. The bread should become deeply golden and crunchy, while the cheese melts around the warm tuna filling.
The key is to cook the sandwiches slowly enough for the cheese to melt before the bread becomes too dark.
If necessary, lower the heat and give the centers a little extra time to warm through.
Step 7: Serve While Hot
Remove the sandwiches from the skillet and place them on serving plates.
Allow them to rest for about one minute before cutting them in half. This gives the melted filling a moment to settle while keeping the bread crisp.
Cut diagonally or straight across, depending on how you like to serve your sandwiches.
Enjoy immediately while the cheese is still warm, creamy, and deliciously gooey.
Tips for Making the Best Tuna Melt
Even a simple four-ingredient recipe can benefit from a few small tricks. These suggestions will help you get the best texture and flavor every time.
Drain the tuna properly. This is one of the most important steps. Excess liquid can make the filling watery and prevent the bread from becoming properly crisp.
Avoid using too much mayonnaise. The goal is a creamy tuna mixture, not a runny one. Start with the recommended amount and adjust only if needed.
Use medium heat. Cooking over high heat may brown the bread before the cheese has time to melt. Medium heat gives the filling time to warm while the outside becomes golden.
Don’t overload the sandwiches. Too much filling can make them difficult to flip and may cause the tuna to spill out during cooking.
Choose cheese that melts well. American cheese is especially good for a smooth, gooey center. Mild cheddar works beautifully too.
Serve immediately. Tuna melts taste best straight from the skillet, when the bread is still crunchy and the cheese is warm.
Easy Variations to Try
One of the best things about this recipe is how easily you can adapt it. The original version needs only four ingredients, but you can add a few extras when you want to change the flavor.
1. Buttery Tuna Melt
For a richer, more traditional grilled-sandwich flavor, lightly spread softened butter over the outside of each bread slice before cooking.
The butter helps create a beautifully golden crust and adds a delicious richness. Just remember that this makes it a five-ingredient version.
2. Cheddar Tuna Melt
Replace the American cheese with medium cheddar. It gives the sandwich a slightly sharper flavor that pairs nicely with the creamy tuna filling.
You can also combine American cheese and cheddar for a balance of smooth melting and stronger cheese flavor.
3. Tuna Melt With Onion
If you enjoy a little extra flavor, mix a small amount of finely diced onion into the tuna and mayonnaise.
Red onion gives the filling a slightly sharper taste, while sweet onion offers a milder flavor.
4. Tuna Melt With Pickles
Finely chopped dill pickles add a pleasant crunch and a tangy contrast to the creamy mayonnaise and melted cheese.
Use a small amount so the extra moisture doesn’t make the filling too wet.
5. Open-Faced Tuna Melt
For a lighter variation, prepare the tuna mixture and spread it over two slices of bread. Add the cheese on top and cook until the bread is toasted and the cheese is melted.
You can finish it under a broiler, watching carefully to prevent burning.
What to Serve With a Tuna Melt
A warm tuna melt is satisfying on its own, but the right side dish can turn it into a complete lunch.
Here are some simple serving ideas:
- Potato chips: Their salty, crunchy texture contrasts nicely with the soft, creamy sandwich.
- Carrot sticks: A fresh and crunchy side that adds color to the plate.
- Dill pickles: Their tangy flavor balances the richness of the mayonnaise and cheese.
- Green salad: A simple salad with a light dressing provides a refreshing contrast.
- Tomato soup: A warm bowl of tomato soup makes this sandwich especially comforting on a cold or rainy day.
- Chicken noodle soup: Another classic pairing for a cozy homemade lunch.
- Fresh fruit: Apple slices or grapes provide a naturally sweet finish.
For a nostalgic presentation, serve the sandwich halves in a simple bowl or on a small plate with pickles on the side.
How to Store Leftovers
Tuna melts are best enjoyed immediately after cooking because the bread loses its crispness as it sits.
If you have leftover tuna filling, transfer it to an airtight container and refrigerate it promptly. Keep it at 40°F (4°C) or below and use it within 3 to 4 days, provided the tuna was handled and stored safely.
If you have already assembled and cooked the sandwiches, refrigerate any leftovers promptly rather than leaving them at room temperature for extended periods.
To reheat a cooked sandwich, place it in a dry skillet over low to medium-low heat. Warm it gently, turning once, until the bread becomes crisp again and the center is heated through.
A microwave can also warm the sandwich, but the bread will become softer rather than crunchy.
For the best results, prepare only as many sandwiches as you plan to eat and keep any remaining tuna filling refrigerated.
Frequently Asked Questions
Can I use tuna packed in oil instead of water?
Yes. Both types work well. Tuna packed in oil usually has a richer flavor, while tuna packed in water is often a lighter option. Just make sure to drain it thoroughly before mixing.
What is the best cheese for a tuna melt?
American cheese is an excellent choice because it melts smoothly and creates a creamy center. Mild or medium cheddar is another delicious option if you prefer a stronger cheese flavor.
Can I prepare the tuna mixture ahead of time?
Yes. You can mix the drained tuna and mayonnaise in advance and store the filling in an airtight container in the refrigerator. Assemble and cook the sandwiches when you’re ready to eat.
Why is my tuna melt soggy?
The most common reasons are insufficiently drained tuna, too much mayonnaise, or excessive moisture in additional ingredients. Drain the tuna well and avoid adding watery ingredients to the filling.
Can I make this recipe without a skillet?
Yes. You can use a sandwich press or an oven-safe method that allows the bread to toast while the cheese melts. Cooking times will vary depending on the appliance.
Can I make more than two sandwiches?
Absolutely. Simply double or triple the ingredients depending on how many people you’re serving. Cook the sandwiches in batches if your skillet is not large enough to hold them comfortably.
Is this recipe suitable for a quick lunch?
Yes. The tuna mixture takes only a few minutes to prepare, and the sandwiches cook in approximately 6 to 8 minutes. It is a convenient option when you want a warm meal without spending a long time in the kitchen.
Conclusion :
There is something special about a simple homemade lunch that doesn’t require expensive ingredients or hours of preparation. This 4-Ingredient Tuna Melt is proof that a few everyday staples can come together to create something genuinely comforting. With canned tuna, mayonnaise, bread, and cheese, you can prepare a warm sandwich that feels much more satisfying than its short ingredient list might suggest.
What makes this recipe particularly appealing is the contrast in textures. The bread becomes golden and crunchy as it cooks in the skillet, while the tuna filling stays creamy and the cheese melts into a delicious, gooey center. Every bite brings together a little crispiness, a little richness, and plenty of familiar homemade flavor.
It’s also a wonderful reminder that good food doesn’t have to be complicated. You don’t need a long grocery list, special kitchen equipment, or expensive ingredients to make a lunch everyone can enjoy. A can of tuna from the pantry and a few slices of bread and cheese may be all you need to prepare something warm and filling.
This sandwich is especially lovely on gloomy afternoons when you want something comforting without making a big production out of lunch. Pair it with crunchy potato chips, a few dill pickles, or a bowl of tomato soup, and you have an easy meal that feels like a little treat in the middle of an ordinary day.
Another reason to keep this recipe close is how flexible it can be. You can use American cheese for a smooth and creamy filling, switch to cheddar for a sharper taste, or add a little onion or pickle when you want extra flavor. You can even prepare the tuna mixture ahead of time, making lunchtime even easier.
Most importantly, this recipe shows that sometimes the meals we remember most are not the fanciest ones. They are the simple dishes prepared with familiar ingredients, shared around the table, and enjoyed when we need a little extra comfort.
So, the next time the weather turns gray and rainy, skip the complicated lunch plans and reach for these four inexpensive ingredients. In just a few minutes, you’ll have a golden, crispy tuna melt with a warm, cheesy middle that may become one of your favorite quick lunches.