
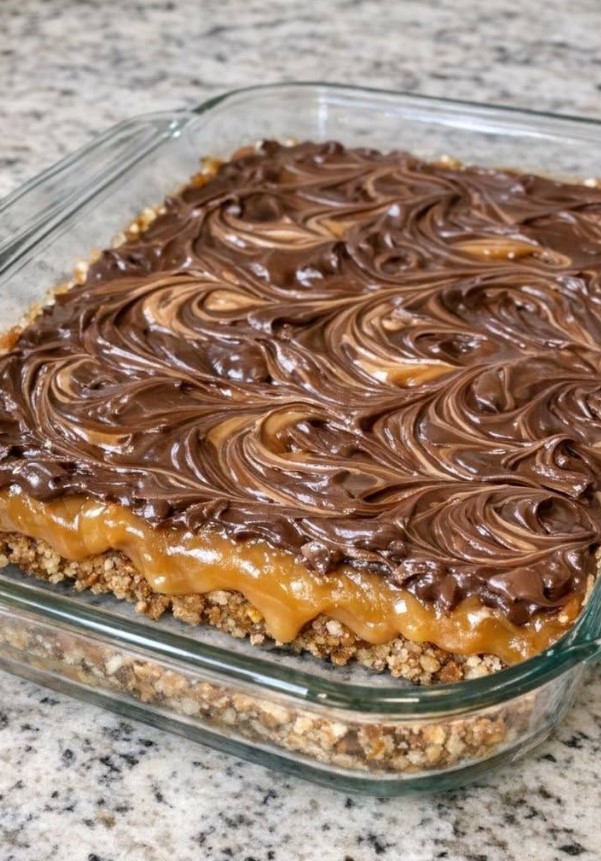
Some family recipes don’t need a long list of ingredients or complicated techniques to become legendary. They’re the desserts that show up at every picnic, church potluck, family reunion, and holiday gathering—the ones that disappear almost as quickly as they’re placed on the table. Grandma Doris’ famous 4-Ingredient Sweet and Salty Bars are exactly that kind of treat.
With a buttery crunchy base, a rich layer of gooey caramel, and a silky chocolate topping swirled into beautiful patterns, this dessert proves that simple recipes can deliver unforgettable flavor. The combination of sweet chocolate and buttery caramel balanced with a touch of salt creates an irresistible contrast that keeps everyone coming back for “just one more piece.”
Whether you’re preparing dessert for a backyard barbecue, packing treats for a bake sale, or simply craving something indulgent without spending hours in the kitchen, these bars are the perfect answer. Best of all, they require only four basic ingredients that you may already have in your pantry.
Let’s discover why this old-fashioned recipe has remained a family favorite for generations.
Why You’ll Love This Recipe
There are countless reasons these bars have become such a beloved classic.
You’ll love them because they’re:
- Made with only four simple ingredients
- Easy enough for beginner bakers
- Rich, buttery, and incredibly satisfying
- Perfect for parties and holidays
- Great for making ahead
- Easy to transport
- No fancy equipment required
- Ready with minimal hands-on preparation
Sometimes the simplest recipes truly are the best.
The Four Simple Ingredients
For the Crust
- 2 cups crushed pretzels
- ¾ cup unsalted butter, melted
For the Filling
- 1 (11-ounce) package soft caramel candies, unwrapped
- 2 tablespoons heavy cream (or milk)
For the Topping
- 2 cups semi-sweet chocolate chips
That’s all it takes to create this crowd-pleasing dessert.
Optional Add-Ins
Although Grandma Doris always kept the recipe simple, you can personalize it with extras such as:
- Chopped pecans
- Toasted walnuts
- Sea salt flakes
- Peanut butter chips
- Butterscotch chips
- Mini marshmallows
- Crushed toffee bits
- Chopped peanuts
These additions add extra flavor and texture while keeping the dessert just as easy to prepare.
Kitchen Equipment
You’ll need:
- 9×9-inch baking dish
- Mixing bowl
- Measuring cups
- Microwave-safe bowl
- Rubber spatula
- Offset spatula or spoon
- Refrigerator
Step 1: Prepare the Baking Dish
Lightly grease a 9×9-inch baking dish or line it with parchment paper.
The parchment makes removing and slicing the bars much easier.
Step 2: Make the Pretzel Crust
Crush the pretzels into small pieces using a food processor or place them in a zip-top bag and crush them with a rolling pin.
Mix the crushed pretzels with the melted butter until evenly coated.
Press the mixture firmly into the bottom of the prepared baking dish.
Use the bottom of a measuring cup to create a compact, even layer.
Bake at 350°F (175°C) for 8–10 minutes.
Allow the crust to cool completely before adding the filling.
Step 3: Prepare the Caramel Layer
Place the caramel candies and heavy cream into a microwave-safe bowl.
Heat in 30-second intervals, stirring between each round until smooth.
Alternatively, melt the mixture over low heat on the stovetop.
Pour the warm caramel over the cooled crust.
Spread evenly with a spatula.
Allow it to cool for about 10 minutes.
Step 4: Melt the Chocolate
Place the chocolate chips in a microwave-safe bowl.
Microwave in 20-second intervals, stirring frequently until completely smooth.
Avoid overheating, as chocolate can scorch quickly.
Spread the melted chocolate evenly over the caramel layer.
Step 5: Create the Beautiful Swirl
For an attractive marbled appearance, reserve a few spoonfuls of caramel before pouring.
Drop small spoonfuls of caramel over the chocolate.
Use a butter knife or skewer to gently swirl the caramel into the chocolate.
Each batch creates a unique design.
Step 6: Chill
Refrigerate the bars for at least two hours.
This allows all the layers to firm up for clean slices.
If you’re in a hurry, place the pan in the freezer for about 30–40 minutes.
Step 7: Slice and Serve
Remove the bars from the refrigerator.
Allow them to sit at room temperature for about 10 minutes before cutting.
Use a sharp knife wiped clean between slices for the neatest presentation.
Why Sweet and Salty Works So Well
One reason these bars are so addictive is the balance of flavors.
The:
- Crunchy pretzels
- Rich butter
- Creamy caramel
- Smooth chocolate
combine to create layers of texture, while the salt from the pretzels perfectly balances the sweetness.
This contrast keeps every bite interesting.
Tips for Perfect Bars
For the best results:
- Crush the pretzels evenly.
- Press the crust firmly.
- Let each layer cool slightly before adding the next.
- Use good-quality chocolate.
- Chill completely before slicing.
- Sprinkle flaky sea salt on top for extra flavor.
These small details make a noticeable difference.
Delicious Variations
Peanut Butter Version
Spread a thin layer of peanut butter over the caramel before adding the chocolate.
Dark Chocolate Bars
Replace semi-sweet chocolate with dark chocolate for a richer flavor.
Turtle Style
Add chopped pecans over the caramel before topping with chocolate.
Holiday Version
Decorate with festive sprinkles before chilling.
Toffee Crunch
Sprinkle crushed toffee bits over the chocolate before it sets.
Perfect Occasions
These bars are ideal for:
- Picnics
- Potlucks
- Bake sales
- Birthday parties
- Family reunions
- Holiday dessert tables
- School events
- Weekend gatherings
They’re easy to transport and always disappear quickly.
Storage Tips
Store the bars in an airtight container.
They’ll keep:
- Up to 5 days at room temperature in a cool environment
- About 1 week in the refrigerator
- Up to 2 months in the freezer
Separate layers with parchment paper to prevent sticking.
Make-Ahead Friendly
These bars are actually even better after they’ve chilled overnight.
Preparing them the day before allows the layers to firm up beautifully while the flavors blend together.
That makes them perfect for entertaining.
Frequently Asked Questions
Can I use caramel sauce instead of candies?
Yes, as long as it’s a thick caramel sauce designed for baking.
Can I use milk chocolate?
Absolutely.
Milk chocolate creates a sweeter dessert, while dark chocolate provides a richer contrast.
Can I double the recipe?
Yes.
Simply use a 9×13-inch baking dish and increase the ingredients proportionally.
Do I have to bake the crust?
A short bake helps create a sturdier crust, but you can chill it instead if you prefer a no-bake version.
Can I freeze these bars?
Yes.
Wrap them tightly and freeze for up to two months.
Thaw overnight in the refrigerator before serving.
Serving Suggestions
Serve these sweet and salty bars with:
- Vanilla ice cream
- Fresh strawberries
- Hot coffee
- Cold milk
- Hot chocolate
- Salted caramel latte
They also make an excellent addition to dessert platters alongside cookies and brownies.
Grandma’s Little Secret
Grandma Doris always believed that recipes didn’t need to be complicated to bring people together. Her secret wasn’t an unusual ingredient or a fancy technique—it was choosing simple pantry staples that complemented one another perfectly. She also knew that pressing the crust firmly, allowing each layer to cool before adding the next, and giving the bars enough time to chill were the small details that turned an easy recipe into an unforgettable dessert. Most importantly, she never served them without sharing them with family and friends, because she believed homemade treats always tasted better when enjoyed together.
Conclusion :
Grandma Doris’ 4-Ingredient Sweet and Salty Bars are proof that some of the most memorable desserts come from the simplest recipes. With just a handful of everyday ingredients, you can create a rich, buttery, chocolate-covered treat that looks impressive and tastes like it took far more effort than it actually did. The crisp pretzel crust, silky caramel center, and smooth chocolate topping create the perfect balance of sweet, salty, crunchy, and creamy in every bite.
Whether you’re making these bars for a family gathering, a holiday celebration, a neighborhood potluck, or simply to satisfy a dessert craving, they’re guaranteed to become a favorite. Their make-ahead convenience, easy preparation, and irresistible flavor make them a recipe you’ll return to again and again. One bite explains why Grandma Doris’ dessert never lasted long on the picnic table—and why everyone always asked for the recipe before heading home.