
Learn how to remove, clean, inspect, repair or replace a sink stopper.
One of the most overlooked parts of a bathroom sink is the sink stopper. This is because many people don’t understand the full purpose of a bathroom sink stopper. Even if the stopper is not closed, it serves to restrict the flow of water to the drain. This helps to catch debris that should not be poured down the drain, such as hair and cotton balls.
However, sink drain plugs need to be removed and cleaned semi-regularly in order to function properly. Learning how to repair a sink drain plug is not difficult, but it is necessary for pop-up sewer maintenance. This helpful guide will also show you how to put in a sink plug replacement if the pop-up sink plug is damaged beyond repair.

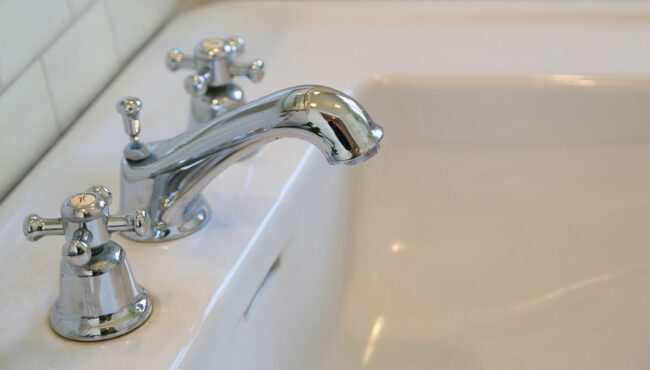
Important bathroom sink stopper parts
Before learning how to fix a sink drain stopper, it is important to first familiarize yourself with the most important parts of the sink stopper assembly.
The pivot rod. The pivot rod extends from the drain to the extension rod. When the lift rod is pulled up or pushed down, it moves up and down, opening and closing the drain plug.
Lift Rod Located between the faucets above the sink, the lift rod closes the faucet when pulled up and opens it when pushed down.
Extension Lever. Sometimes referred to as a clevis band, this piece of metal connects the lift rod to the pivot rod.
Spring clips. These are V-shaped fasteners that connect the pivot rod to the extension rod.
Pivot Nut This nut is used to secure the pivot rod to the drain.
Washer A round rubber part inserted between the drain plug and the sink to prevent leakage.
Drain plug. Drain plugs with integrated pivot rods usually have a short dedicated drain tube with an opening to extend the pivot rod to the cleat band.
Sink Plug. Used to seal the sink, catch large pieces of debris that should not be poured into the sink, and prevent clogging. This part is available with a pivot rod, lift rod and extension rod assembly, or with a separate pop-up sink drain plug that can be used without removing the drain.
Before you start.
Since the sink plug assembly comes with many small parts, it is recommended to keep a bucket or other container nearby where the parts can be placed when not in use. This simple step will reduce the chance of losing these parts before assembling the sink stopper. Also, as you learn how to remove a bathroom sink stopper, keep in mind that you should avoid using force if the sink stopper is stuck.
Excessive pressure can damage a porcelain sink and create a more difficult situation to fix. Instead, use a cutter or putty knife to cut through old plumber’s putty to loosen the sink plug. When working with sharp objects, remember to wear protective gloves to avoid personal injury.
Step 1: Determine what type of sink plug you have.
The first step in sink stopper cleaning and repair is to determine if your sink stopper assembly operates the stopper with a pivot rod, extension rod and lift rod, or a universal pop-up stopper with an internal spring mechanism. This decision is made to determine if.
It’s easy to spot a complete sink plug assembly because they usually have a lift lever located behind the faucet or between the hot and cold handles. Pull this lever up and the sink stopper will close. If you look under the sink, you’ll find a pivot bar that extends from the drain and an extension bar that attaches to the pivot bar.
Universal sink plugs do not have this component. This type of stopper can be closed by pressing down on the stopper itself. When it is pushed down again, it opens. This simple spring mechanism is easy to use and can be installed in sink drains with the correct drain diameter. This type of sink stopper does not require the installation of a drain with a stopper.
Step 2: Remove the existing bathroom sink stopper assembly.
If you have a universal type bathroom sink stopper, you can remove it from the drain by opening the existing stopper and pulling it upward. The stopper should pull out relatively easily without the use of tools, but if it gets stuck, try using locking slot pliers to get a better grip. Note that pulling the plug out with a wrench may damage the sink. While pulling up on the plug, gradually loosen it by twisting it back and forth to disengage it from the drain.
For sinks with sink stopper assemblies, you must first pinch the spring clip on the extension rod to separate it from the pivot rod. Next, unscrew the pivot nut and pull it out of the plug drain. You will also need to disconnect the extension rod from the lift rod and pull the lift rod up and out of the sink.
Lift the sink stopper up and pull it out of the drain, being careful not to damage the stopper. Loosen the nut on the P-trap and disconnect it from the drain, allowing enough room to unscrew the plug drain tailstock from the bottom of the sink and remove it. Finally, use slot-locking pliers to loosen the locknut holding the drain in place, then push the sink drain up from the bottom and grasp it firmly enough to allow enough room for it to protrude from the sink. Pull it out of the drain hole and set aside the parts for inspection, cleaning, and reassembly.
Step 3: Clean and inspect the parts thoroughly.
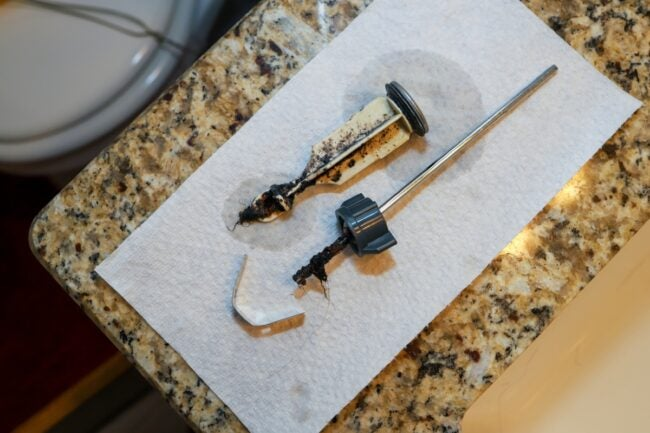
Plugs that are not cleaned regularly can accumulate debris and cause the sink to clog. If the sink drains slowly or the plug does not seal properly, cleaning the parts can often solve the problem. Thoroughly clean all parts of the sink stopper assembly using a soft bristle brush and mild detergent or vinegar.
Once the parts have been cleaned, inspect them for any visible signs of wear or damage. If the parts are OK, proceed to step 5, but if the parts are damaged or visibly worn, you will need to obtain one replacement part that is compatible with the current plug or replace the entire plug assembly.
Step 4. Replace broken or severely damaged parts.
Upon inspection, you may find parts that are severely damaged or completely broken, but that does not mean you need to replace the entire assembly. Search your local home improvement store or the Internet for replacement parts for your current sink plug system.
You can also purchase a new sink stopper assembly or take this opportunity to replace it with an all-purpose pop-up stopper that has a built-in spring mechanism for easy maintenance. In either case, be sure to check the product information before purchasing to ensure that the sink stopper is compatible with your sink. Remove the new pop-up combination and unscrew and unscrew the drain tip mounting nut. Install the plastic washer, followed by the rubber washer, and push it down to the top of the mounting nut.
Apply a thin layer of pipe joint compound to the top surface of the rubber washer so that it adheres to the sink. Applying compound to the rubber will ensure that it adheres to the bottom of the sink drain. Pipe joint compound is not strictly necessary, but it may be difficult to get the rubber to seal without it.
Push the tail assembly of the pop-up drain up as high as possible from the drain opening under the sink. With the drain secured, place the drain ring in the opening above the sink and hand thread the ring all the way to the end of the drain. (Make sure the threads on both are correct and do not cross). Then simply tighten it by hand to secure it in place.
From under the sink, hold the end of the drain still with one hand and tighten the mounting nut upward toward the bottom of the sink. Make sure the opening at the end (where the pop-up pivot lever is located) is facing straight into the wall. Using channel-locking pliers, tighten the mounting nut while continuing to hold the tailpiece in place. This nut should not be over-tightened, but tight enough to prevent the drain assembly from rotating in the drain.
Step 5: Reassemble the basin stopper.
Once you have cleaned the existing parts or procured new parts, you can begin reassembling the basin stopper. Roll out the putty and place it around the drain opening, then slide the drain opening and secure the locknut with slot-locking pliers. The putty will seep out the top of the drain, so simply wipe off the excess with a damp cloth.
Apply pipe joint compound to the threads of the plug drain tip and reattach the plug drain to the drain. Re-position the P-Trap, tighten the nut to secure it to the drain, and then insert the plug until it snaps snugly into the drain hole. Slide the lift rod over the tap and re-secure it to the extension rod. Next, insert the pivot rod into the plug drain and tighten the pivot nut to secure. Thread the spring clip through the pivot rod and reconnect the pivot rod to the extension rod. Ensure that the poppet is fully open and closed. If not, the angle of the pivot rod can be adjusted by sliding the spring clip on the extension rod.
Step 6. Test for leaks and function.
Drain the water and check for leaks from the P-wrap, plug drain, drain, and pivot nut. Also, take this opportunity to close the sink plug and fill it with water to test that the plug is sealed and that water does not run down the drain. Once you are satisfied that there are no leaks, also perform a water flow test with the plug open. Run water down the sink with the stopper open and see how fast the water drains out of the sink. If it seems to drain slowly, you may need to adjust the pivot lever to allow the plug to open further.
Final Thoughts
Maintaining the infrastructure of a plumbing system is essential for a home to function. Not all problems can be solved by drain snaking. Sink plugs are not as important as toilets and showerheads, but they should be cleaned, inspected, and replaced on a regular basis to prevent slow sink drainage. The simple steps above will help the average DIYer learn how to fix a sink plug.
Remember that universal pop-up plugs are much easier to clean and maintain than using conventional pop-up plugs because they operate by an internal spring mechanism rather than relying on a complex assembly of pivot rod, extension, and lift rod Please note that this is not the case with the universal pop-up sink plugs. The only downside to the universal pop-up sink plug is that you have to push the actual plug to close or open the plug, whereas with a more traditional sink plug assembly you can put your hand outside the sink.


