
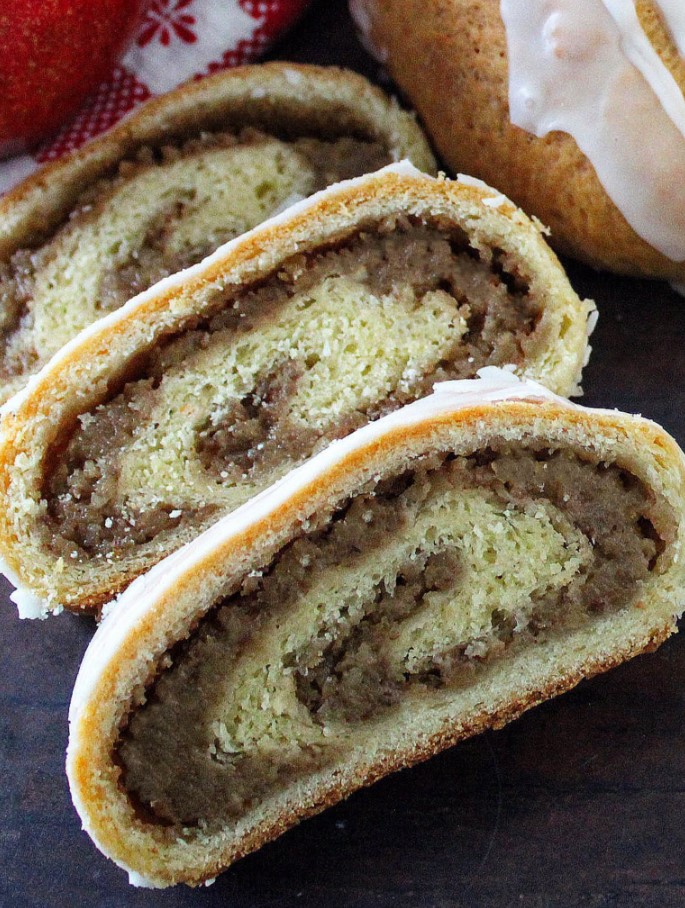
There’s something truly special about homemade pastries that have been passed down through generations, and Hungarian Nut Rolls are a perfect example. With their tender, buttery dough wrapped around a rich walnut filling, these traditional pastries have long been a centerpiece at holiday gatherings, family celebrations, and cozy weekend baking sessions. Every slice reveals beautiful swirls of sweet, nutty filling tucked inside a soft, lightly golden crust that practically melts in your mouth.
While they may look like something you’d find in a European bakery, Hungarian Nut Rolls are surprisingly achievable at home with a little patience and care. The reward is well worth the effort—a fragrant kitchen, a tray of beautiful homemade pastries, and a dessert that tastes even better the next day. Whether you’re baking them to honor family traditions or trying them for the first time, this recipe is sure to become one you’ll treasure for years to come.
Why You’ll Love These Hungarian Nut Rolls
These classic pastries have remained popular for generations because they offer the perfect balance of texture and flavor.
- Soft, rich homemade dough
- Sweet walnut filling with warm spices
- Beautiful swirled appearance
- Perfect for holidays and special occasions
- Delicious served with coffee or tea
- Easy to freeze for later
- Even better after resting overnight
Every bite delivers a comforting combination of buttery pastry and sweet walnut filling that’s impossible to resist.
Ingredients :
For the Dough
- 4 cups all-purpose flour
- 2¼ teaspoons active dry yeast
- ½ cup warm milk
- ½ cup granulated sugar
- ½ teaspoon salt
- 2 large eggs
- ½ cup unsalted butter, softened
- 1 teaspoon vanilla extract
- Zest of one lemon (optional for authentic flavor)
For the Walnut Filling
- 3 cups finely ground walnuts
- ¾ cup granulated sugar
- ½ cup milk
- 2 tablespoons melted butter
- 1 teaspoon vanilla extract
- 1 teaspoon cinnamon
- Pinch of salt
Optional Glaze
- 1 cup powdered sugar
- 2–3 tablespoons milk
- ½ teaspoon vanilla extract
Step 1: Activate the Yeast
Combine the warm milk with a teaspoon of sugar and sprinkle the yeast over the top.
Allow it to sit for about 5 to 10 minutes until it becomes foamy.
This step ensures your yeast is active and ready to produce a soft, fluffy dough.
Step 2: Make the Dough
In a large mixing bowl, combine the flour, remaining sugar, and salt.
Add the eggs, softened butter, vanilla, lemon zest, and the activated yeast mixture.
Mix until a soft dough forms.
Transfer to a lightly floured surface and knead for 8 to 10 minutes until smooth and elastic.
If using a stand mixer, knead with the dough hook for about 6 minutes.
Step 3: Let the Dough Rise
Place the dough into a lightly greased bowl.
Cover with a clean towel or plastic wrap.
Allow it to rise in a warm location for approximately 1½ hours or until doubled in size.
Step 4: Prepare the Walnut Filling
While the dough rises, combine the milk, sugar, butter, cinnamon, vanilla, and salt in a saucepan.
Heat gently until the sugar dissolves.
Remove from the heat and stir in the finely ground walnuts.
Mix until a thick, spreadable filling forms.
Allow it to cool completely before using.
Step 5: Divide the Dough
Punch down the risen dough.
Divide it into two or three equal portions depending on the size of rolls you’d like.
Keep unused portions covered while working.
Step 6: Roll Out the Dough
On a lightly floured surface, roll each portion into a rectangle about ¼-inch thick.
Try to keep the thickness even so the rolls bake uniformly.
Step 7: Spread the Filling
Spread the cooled walnut mixture evenly over the dough.
Leave about a half-inch border around all edges to prevent the filling from spilling out during baking.
Step 8: Roll It Up
Starting with the long side, roll the dough tightly into a log.
Pinch the seam closed.
Tuck the ends underneath for a neat appearance.
Place each roll seam-side down on a parchment-lined baking sheet.
Step 9: Second Rise
Cover the rolls loosely.
Allow them to rest for another 30 to 40 minutes.
This second rise helps create a lighter texture.
Step 10: Bake
Preheat your oven to 350°F (175°C).
Brush the tops lightly with beaten egg for a glossy finish.
Bake for 30 to 40 minutes until beautifully golden brown.
The internal temperature should reach about 190°F.
Allow the rolls to cool completely before glazing or slicing.
Step 11: Add the Glaze
If desired, whisk together powdered sugar, vanilla, and milk until smooth.
Drizzle over the cooled rolls.
Allow the glaze to set before serving.
Expert Tips for Success
Grind the Walnuts Finely
A fine texture produces a smooth filling that’s easy to spread and slice.
Cool the Filling Completely
Warm filling can soften the dough and make rolling difficult.
Roll Tightly
A firm roll creates beautiful spiral layers inside each slice.
Don’t Overfill
Too much filling may leak during baking.
A thin, even layer produces the cleanest slices.
Use Fresh Walnuts
Fresh walnuts have a naturally sweet flavor without bitterness.
Delicious Variations
Poppy Seed Filling
Replace the walnuts with sweetened ground poppy seeds for another traditional Hungarian favorite.
Cinnamon Raisin
Add chopped raisins to the walnut mixture.
Chocolate Walnut
Mix mini chocolate chips into the cooled filling.
Honey Walnut
Replace part of the sugar with honey for deeper flavor.
Orange Walnut
Add fresh orange zest for a bright citrus twist.
Serving Suggestions
Hungarian Nut Rolls pair wonderfully with:
- Fresh coffee
- Hot tea
- Cappuccino
- Espresso
- Hot chocolate
- Vanilla ice cream
- Fresh whipped cream
- Fresh berries
They’re equally delicious for breakfast, brunch, dessert, or an afternoon snack.
Storage Tips
Store completely cooled rolls in an airtight container at room temperature for up to four days.
For longer freshness, refrigerate for up to one week.
Wrap tightly to prevent them from drying out.
Freezing Instructions
Hungarian Nut Rolls freeze exceptionally well.
Wrap each roll tightly in plastic wrap followed by aluminum foil.
Freeze for up to three months.
Thaw overnight before serving.
Warm slightly in the oven for freshly baked flavor.
Frequently Asked Questions
Can I make the dough ahead of time?
Yes. Refrigerate the dough overnight after the first rise and continue the next day.
Can I use store-bought walnuts?
Absolutely. Just make sure they’re fresh and finely ground.
Why did my filling leak?
Usually the roll was overfilled or not sealed tightly enough.
Can I freeze unbaked rolls?
Yes. Freeze after shaping and thaw before allowing the second rise.
Can I make mini rolls?
Definitely. Simply divide the dough into smaller portions and reduce the baking time slightly.
A Dessert That Brings Families Together
Few baked treats carry the same sense of tradition and comfort as Hungarian Nut Rolls. Their beautiful swirls, buttery dough, and rich walnut filling make them just as impressive on a holiday dessert table as they are alongside a simple afternoon cup of coffee. While they take a little more time than everyday pastries, the process itself becomes part of the experience, filling the kitchen with the warm aroma of fresh bread, toasted walnuts, cinnamon, and vanilla.
These rolls are more than just a delicious dessert—they’re a recipe that encourages slowing down, sharing family stories, and creating lasting memories. Many families have their own version passed from one generation to the next, making each batch a connection to the past while creating new traditions for the future.
Conclusion :
Hungarian Nut Rolls are a wonderful reminder that some of the best recipes are those rooted in tradition. Their tender, buttery dough and rich walnut filling create a timeless combination that has delighted families for generations. Whether you’re baking them for Christmas, Easter, a family reunion, or simply because you’re craving something homemade, these rolls never fail to impress with their beautiful appearance and comforting flavor.
Although they require a little patience, every step is rewarded when you slice into the finished roll and reveal its perfectly swirled layers of sweet walnut filling. They store beautifully, freeze exceptionally well, and often taste even better a day after baking, making them an excellent make-ahead dessert for busy holidays or special occasions.
Once you’ve mastered this classic recipe, you’ll understand why it has remained a beloved favorite across generations. Serve it with a warm cup of coffee, tea, or hot chocolate, and you’ll have a dessert that feels both elegant and comforting. Whether you’re continuing a cherished family tradition or discovering Hungarian baking for the first time, these homemade nut rolls are sure to become a treasured addition to your own recipe collection—one you’ll look forward to sharing with family and friends for many years to come.