
Discovering that you’ve been using a common household item incorrectly can be a humbling yet enlightening experience. A prime example of this is the often overlooked art of plunging. For ages, the unsuspecting DIY plumber would grab the first plunger in sight, hoping it would work its magic on any drain. However, let’s not point fingers; instead, let’s shed some light on the underappreciated skill of amateur plumbing.
At your local hardware or big box store, you’ll find two types of plungers: one tailored for toilets and the other for sinks. They might seem identical at first glance, except for the distinct shapes at the head of these plumbing essentials. The toilet plunger, often referred to as a flange plunger, features an additional soft rubber flap, or flange, that folds out from inside the cup. This design is specifically engineered to fit snugly into the curved drain of a toilet, creating a strong seal and allowing for maximum suction and effective plunging.
On the other hand, the sink plunger, commonly known as a cup plunger, has a simple, flat-bottomed rubber cup. This straightforward design is ideal for flat surfaces like sinks, bathtubs, and showers. The flat rim of the cup plunger can sit flush against the surface, providing a seal that helps to dislodge clogs with repeated plunges.
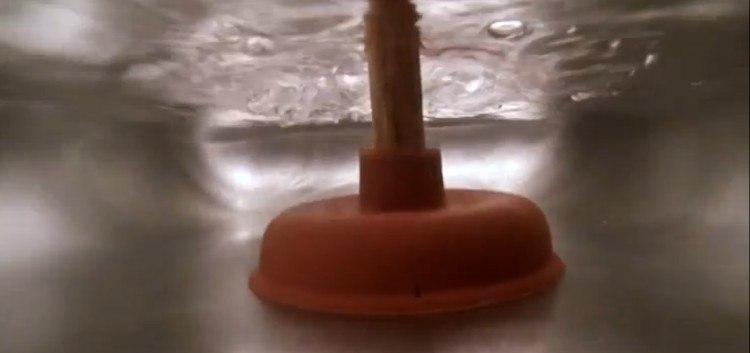
Consider the red plunger with a simpler suction device on its head. This one is your go-to for sinks. Its flat bottom is specifically designed for sinks or bathtubs. To maximize its effectiveness, position the rounded edge of the suction cup over the sink drain, creating a tight seal that acts like a vacuum, effortlessly clearing the clog. It’s that simple!

On the other end of the spectrum is the more intricate toilet plunger, featuring a protruding flange at the head. Despite the unglamorous name, this piece works wonders. Functionally, toilet plungers are similar to sink plungers, utilizing the protruding flange to create a suction force on the unique shape of the toilet drain. The only technical difference is that, before initiating the plunging action, ensure to fill the head (or bell) with water. See? They’re not so different after all.
Armed with this newfound knowledge of selecting the right plumbing tool, it’s time to delve into the proper plunging technique. Bid farewell to the days of urgently dialing your plumber for a simple clog.
Plunger Selection: Next time you face a drain dilemma, remember the golden rule: red plungers for sinks and bathtubs, and those with a protruding flange for toilets. The right tool for the right job makes all the difference.
Plunging Technique: For sink plungers, position the rounded edge over the drain and create a tight seal for a vacuum effect. For toilet plungers, ensure to fill the bell with water before plunging, utilizing the protruding flange for optimal suction.
Conclusion:
By understanding the nuances of plungers and mastering their correct usage, you’ve empowered yourself to tackle simple clogs with confidence. No more reliance on costly plumber visits for straightforward plumbing issues. Embrace your newfound plumbing prowess! Not only will you save money, but you’ll also experience the satisfaction of solving household problems on your own.
Taking control of these minor plumbing tasks is a step towards greater self-reliance and home maintenance competence. You’ll gain a deeper appreciation for the tools and techniques that keep your home running smoothly. Plus, every successful repair builds your skills and confidence, preparing you for even more DIY challenges in the future.
Remember, the key to success is in your hands – or, more accurately, in your choice of plunger. With the right knowledge and tools, you can handle those pesky clogs with ease and efficiency. Happy plunging! Enjoy the peace of mind that comes with knowing you can maintain your home’s plumbing with expertise and finesse.
image source : crafty house


