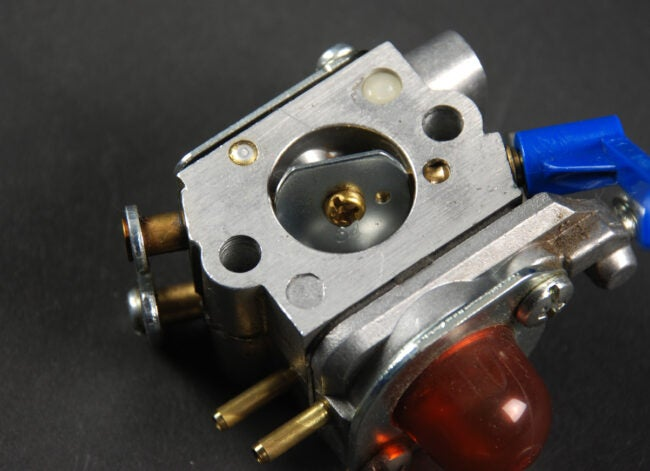
Step 4: Remove the carburetor.
Before disassembling the carburetor, it is important to note that each of the removed parts must be put back in the same place. If you do not yet have a suitable place to disassemble the carburetor, consider taking pictures while you work to avoid confusion when reassembling.
Begin disassembly by placing the carburetor in the middle of a clean work area, putting on gloves, and cleaning around the fuel bowl with carburetor cleaner. Next, remove the fuel tank bolts and poke them with a paper clip or thin wire to make sure the nut holes are free of obstructions. Next, remove the float, which should be attached to the carburetor by a hinge pin, and if necessary, remove and replace the needle. Assemble all parts.
Step 5: Replace worn parts.
Even the best carburetor cleaner cannot repair worn parts. If you find visibly worn parts such as floats, needles, pins, or gaskets, you must obtain a carburetor repair kit for your specific carburetor and make the necessary repairs. Some carburetor parts, such as gaskets, wear out quickly. When planning your annual carburetor cleaning, it is a good idea to have spare parts on hand so that you do not have to disassemble the carburetor more than once. Replacing the mower’s air filter can also simplify maintenance tasks.
Step 6. Clean the carburetor and carburetor components.
With the carburetor disassembled and gloves on, carburetor cleaner can be sprayed inside the carburetor housing to clean the various parts. Carburetor cleaner is sold in aerosol cans, which are ideal for quick and effective cleaning, but can also be purchased in bottles or jugs.
If liquid carburetor cleaner is used instead of the spray type, the cleaner must be poured into an empty bucket and the parts soaked. Connect the larger parts of the carburetor to the wires and carefully place them in the bucket filled with carburetor cleaner. Before placing the small parts of the carburetor in the bucket, wrap them in an aluminum sieve or fine-mesh basket. Allow it to soak for approximately one hour, then remove it from the cleaning solution.
Step 7: Reassemble the carburetor.
Rinse the carburetor parts with water to remove excess carburetor cleaner. Then blow with compressed air or allow to dry naturally. It is important that the parts are completely dry before reassembly.
Once you are sure that the carburetor parts are dry, you can begin to put the carburetor back together. Refer to the photos taken during disassembly to reassemble it correctly.
Once the carburetor is put back together, install it on the mower, reattach the throttle cable and choke cable, and reattach the fuel line. Tighten the bolts on the carburetor and attach the air filter to the mower.
Step 8: Test the mower
After reassembling the carburetor and air filter, fill the tank with fuel and start the mower to verify that the maintenance was successful. Ideally, the engine should start easily after cleaning the carburetor, but if it still has problems starting, take the mower to a small engine repair shop for diagnosis.
Final Thoughts
To keep your mower running as long as possible, regular maintenance is required throughout the year. This includes cleaning the carburetor at the start of the mowing season, winterizing the mower at the end of the season, changing the oil, changing the spark plugs, and sharpening the knives if necessary. Failure to perform regular maintenance on a mower can lead to breakdowns in a relatively short period of time and more expensive repair bills.


