
Knowing where your mower’s carburetor is located and how to clean it will keep your mower running smoothly for a long time.
After a long winter, many homeowners encounter the problem of their mower’s engine not running when they try to mow the grass. This could be a sign that the mower’s carburetor is gummed up or corroded. It is important to perform annual maintenance at the beginning of the mowing season to address problems that can occur over time.
A dirty or restricted carburetor can also be a sign that the engine starts but stalls during use, black smoke comes out of the muffler, fuel consumption increases significantly, or the engine starts poorly during normal use. Learn how to clean your lawn mower’s carburetor and how to diagnose whether you need a lawn mower carburetor cleaner or a more complicated carburetor repair.
Before we begin.
If a dirty carburetor is not the cause, it is important to check for any other causes. Before spraying aerosol cleaner or carburetor cleaner down the carburetor throat, double-check that there is fuel in the tank, that the fuel valve is open, and that the spark plugs are in working order. After spraying the carburetor cleaner, try starting the engine. If the engine runs perfectly, then there is a problem with the fuel system. However, if the engine will not start after several attempts, the problem may be more serious. In this case, take the mower to a small engine repair shop.
Step 1: Clean the outside of the mower’s engine.
Since the purpose of learning how to clean a lawn mower’s carburetor is to remove dirt and debris that may be causing the engine to run poorly, start cleaning the carburetor of the lawn mower by cleaning its outside with the engine off. This will make it easier to keep the inside of the carburetor clean during disassembly.
You should also take the time to brighten up your work area and clean it so that you do not lose any small parts while working on it. Make sure you have a clear space on your workbench where you can disassemble, clean, repair, and reassemble each component of the carburetor.
Step 2: Remove the air filter to access the carburetor.
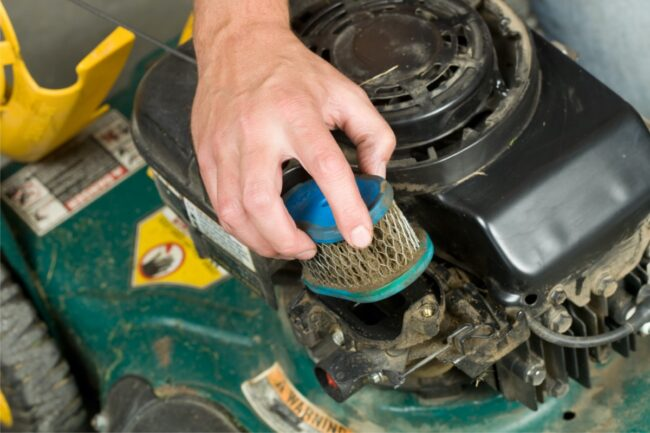
To access the carburetor on the lawn mower, the air filter housing must be removed. The air filter is usually located on top of the carburetor. Check to see if the air filter is attached with clips or screws, loosen the fasteners with a screwdriver, place it in a safe place, and reinstall it. Next, remove the air filter. You may wish to check the air filter and clean or replace it if necessary. If you have difficulty removing the air filter, the mower’s owner’s manual should have detailed information on this part.
Step 3: Remove the carburetor.
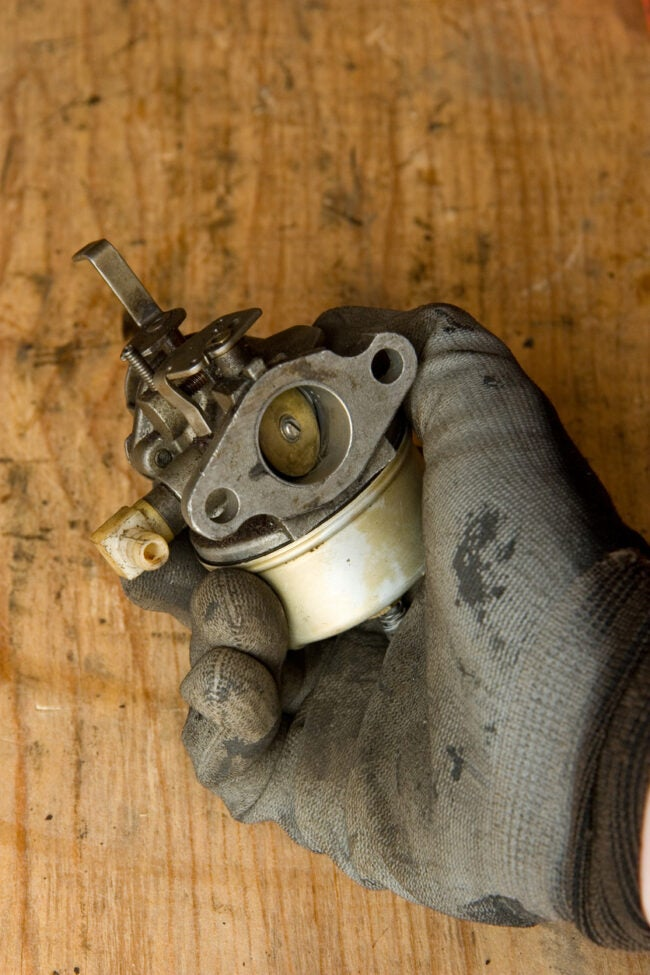
Wearing durable gloves to protect your skin, spray the carburetor throat with lawn mower carburetor cleaner or clean the outside of the part. However, to clean the inside of the carburetor, it must be completely removed from the engine. Using a nut driver or socket wrench, remove the two bolts securing the carburetor to the engine and disconnect the throttle cable and choke cable from the carburetor.
Also note (or photograph) the location of the cables and hoses so that they can be put back in place. Prepare a bucket or bowl to catch the fuel, then remove the fuel line from the nipple on the carburetor housing using pointed pliers. If no gas is coming out of the fuel line, the fuel line or fuel filter may be clogged and must be addressed before reassembling the mower.
Once the carburetor is removed, pull the carburetor off the mounting bolts, being careful not to damage the main gasket between the carburetor and the engine. Also note the position of the carburetor so that it will not be reversed when reassembled. Place the carburetor in the bucket and allow the fuel to drain out.
CLICK NEXT PAGE BELOW TO CONTINUE READING …


